Saturday, December 22, 2012

The Mermaid Tail : Photoshoot!!!!

Now that all those Christmas dresses are out of the way I can show you the Mermaid tail shoot!

These FAAABULOUS photos were taken by the amazing Miss Sasha at Sherbet Birdie.  In my opinion, the best pinup photographer in Australia.  If you're ever in Sydney you should book in for a shoot!


I hope you love these photos as much as I do - they definitely make all that work on the tail worthwhile!

Beccie
xxx

Friday, December 21, 2012

Christmas Outfit No. 4 - My Ultimate Christmas Dress!

Its the last Christmast post!!!

This dress revolves around the most amazing Christmas fabric I have found, and the best thing about it was that there was a full 7 metres of it!


Now I really really wanted to do justice to this magnificent fabric, so I grabbed out my pattern for the sweetheart neckline bodice from my tropical print dress and made some decorative enhancements:


Here is one of them - that bloody bow took one whole hour to make.  Mind you this could be because this was the third dress I was sewing in two days and I was a leeeeetle tired by then!

I then cut out 2.5m from the length of the fabric to make a really full gathered skirt - I wanted it to be as full and as gathered as possible!

What I ended up with was this:


HOW ADORABLE!!!

This is my favourite one of the week, so I made sure to save it to Friday.  I love the way that the bow and the faux wrap bust and halter tie make it look like I'm wrapped up like a present.


I actually got the inspiration for the bow from the print on the fabric - it has bows wrapped around sticks of holly.


And once again, this bodice has six bones - two in the front, two in the back and two in the sides.

Oh, and I also went way out with my accessories for this outfit - if you're going to go over the top, you need to go OVER THE TOP!


The necklace is my last piece this year from Lucy Luxxe, and I call it my Christmas Crazy necklace.  Renee made it for me by casting from some vintage brooches I purchased - see the Santa on the hair bow?  I also have the Rudolf one, but there was no where for it on this outfit...

So that is my final Christmas outfit!  I hope you've all enjoyed the festive madness!!

Merry Christmas to you all!!!!!

Beccie
xxx


Thursday, December 20, 2012

Christmas Outfit No. 3 - The Jolly Santa Circle Skirt

If you haven't already worked it out I just LOVE Santa Clause!  So when I found this fabric, I bought it without a second though - even though there was only 70 inches or 1.5 metres of it, which isn't really enough to do anything...


But then I thought about it for a bit and worked out what I could do!

I grabbed out this pattern:


Its for a 10 gore circle skirt, which obviously I don't have enough fabric for, so I also grabbed out some red fabric and some ric rac...

Anyone know where I'm going here?

I traced the pattern piece and made some adjustments and then created this:


This is one of the 10 gores.  I ran ric rac down either side of the santa panel, like this:


I could have skipped that step, but I like details.

I had hoped to get each gore with a Santa on it... but I only had enough fabric for 6 gores, but I had 10... so I decided just to do 5 with Santa's and 5 without.  Thats the thing with vintage fabric, I can't just go down the street and get more!


I also ran a strip of the vintage fabric around the centre of the waistband, for no other reason than because I could.

The finished skirt looks like this!


I have paired it with an off the shoulder 'Bettie Page' brand top I have, and some lovely red shoes.  And this skirt is so huge that I wear TWO petticoats underneath it!

I am going shopping tonight to do all my Christmas shopping, and I'm going to have my photo taken with Santa while I'm there - and I thought this outfit would be PERFECT!!!  Check my Facebook page for updates on that bit of festive silliness!

And here is another picture of Stella, this time wearing her Christmas tshirt.  Its from a couple of weeks ago, before she had her hair cut:


The skirt is not as adorable as yesterday's outfit, but still over-the-top festive.  Don't you agree?

Beccie
xxx

Wednesday, December 19, 2012

Christmas Outfit No. 2 - Santa Wiggle Dress

Not that long ago I found this gorgeous piece of vintage Christmas fabric:


The lady on Etsy had two pieces of it to sell.  One was 64 inches long, the other was 54 inches long, so a total of 118 inches, or just under 3 metres.  By the looks of it they were originally Christmas themed curtains back in the 1950s, and due to this there was a little bit of staining and discolouration in places.  But for US$22 how could I pass it up?

I decided to make a cute wiggle dress from this adorable fabric.  But of course, I didn't just use one pattern... Can't go doing something like making it easy for myself can I!  I used the skirt pieces from this pattern (which actually fits me!):


And I turned this top into a bodice (this one fits me too!):


Actually, I really love this pattern, and it worked up really easily, so I might be using this a bit more to make myself some easy summer tops.  And I'm a bit partial to the lady on the left with the big bow belt and circle skirt... hmmmmm.

And what I ended up with was this:


Possibly the cutest wiggle dress ever!

To do justice to this piece of fabric, I decided that I needed to piece the bodice so that Santa was in the front and the reindeer wrapped around the side, with the border of the fabric around the bottom of the skirt and repeated again in the foldover at the top of the bodice.


I really like the way that the border repeats itself at the top and the bottom of the dress.


The back is really nice too, and has a vent instead of a split.  I read on someone else's blog about them having a phobia of skirt splits cause they can split without you noticing and before you know it your bottom is on display!!!!  I've been paranoid ever since!!!!

This bodice is also fully boned with 6 bones (two front, two back and two side).  Its not going anywhere!

And I decided to accessorise this one with vintage bracelets and a red belt.  I feel the dress is decorative enough without adding too many accessories.  Well today I feel like that... who knows next time I wear it!


Stella wouldn't stop photo bombing so I took that to mean she wanted to make an appearance too!

So what do we think of Dress Two???

Beccie
xxx


Tuesday, December 18, 2012

Christmas Outfit No. 1 - The Poinsettia Dress

I made this first dress out of some lovely stripy poinsettia patterned vintage fabric I purchased.  I found it on Etsy and there was 7m of it, so I have plenty left over.


Its a very VERY light cotton and its a bit on the sheer side, but it definitely makes a lovely light summer dress.  And we all know what happens when I get a striped fabric...


I go a little mad running stripes every which way and have lots of fun matching seam lines!  And even though I was trying to sew four dresses in one weekend I wasn't going to let this opportunity escape me!


I made the dress using the bodice from my tropical print dress pattern that I drafted, just without the shirred back panels, cause honestly I just didn't have time.  I also adjusted it a little so the fit was a bit better around the bust


So it fits like a glove now!  Instead of the gathered skirt that I used on the tropical print dress, I used the full circle skirt pattern that made Renee's cherry skirt.  I really love the way that the stripes on the skirt are horizontal on the front and back, where the bodice is in a chevron pattern, and vertical on the sides where the bodice is horizontal.  It just all worked out so well!!


I also boned the bodice (6 bones in all - two in front, two in the sides, and two in the back) so it would support itself.  I just HATE hitching things up all day.  And instead of hemming the skirt, I finished it with matching green bias tape - 5 metres of it to be exact!

To follow with the poinsettia theme, I stole two off my tree and, with a little bit of help from my hot glue gun, I turned them into matchy-matchy hair clips!  Oh - and the earrings!!!  They are a vintage find and are actually painted shells.  There is also a matching sweater clip, but its too warm to be wearing a sweater here today :)

Anyway, I hope you love my first Christmas Dress!  This one is very conservative compared to the others.  As I said to someone this morning, we will be accelerating into crazy territory by the end of the week!

Beccie
xxx

Monday, December 17, 2012

The Week Before Christmas

I had so many plans for this week...

For months, I have been collecting vintage Christmas fabrics.  Some of them are AHHMAZING too - such wonderful finds...  and I planned to have 5 outfits, one for every day this week in the lead up to Christmas.  It truly is my favourite time of the year.

I managed to have one item made (a skirt) for when my family and I put our Christmas tree up a couple of weeks ago, but thats been the only thing I had made.  The whole thing has really snuck up on me...

Those that follow my Facebook Page will know that I decided to throw myself into sewing four outfits on the weekend.  Yep, four.  When I raised the idea on Facebook it generated discussion about binge sewing, and pulling all-nighters.  I wasn't sure if I could pull it off, but being a determined woman, I gave it my best shot!

Sneak Peak - Dress One

I MADE THREE FULLY BONED DRESSES IN ONE WEEKEND!!!!!
But that means that I'm down one outfit....

 Sneak Peak - Dress Two

So this week I will be posting EVERY DAY (apart from today...) about what I'm wearing.  How exciting!  This week is going to be a blogging frenzy to follow my sewing frenzy weekend!

Sneak Peak - Dress Three

There is not going to be any detailed construction posts unfortunately, because I was too engrossed in what I was doing and forgot to take photos...

Sneak Peak - Dress Four

But if you see something you love and you have questions, feel free to ask.  I love sharing!

So I hope you're looking forward to seeing what I've made as much as I'm looking forward to wearing them and showing them off.  I love getting in to the holiday spirit!!! 

Sewing Frenzy
proudly brought to you buy Red Bull and crappy Cola

Beccie
xxx

Thursday, December 13, 2012

Upcycling - Yay or Nay?

I don't know about you but the word 'upcycling' gives me the heebie-jeebies.  It makes me think of all the amazing vintage clothing that gets turned into things like this:

This WAS a 1950s ballgown

Or this:

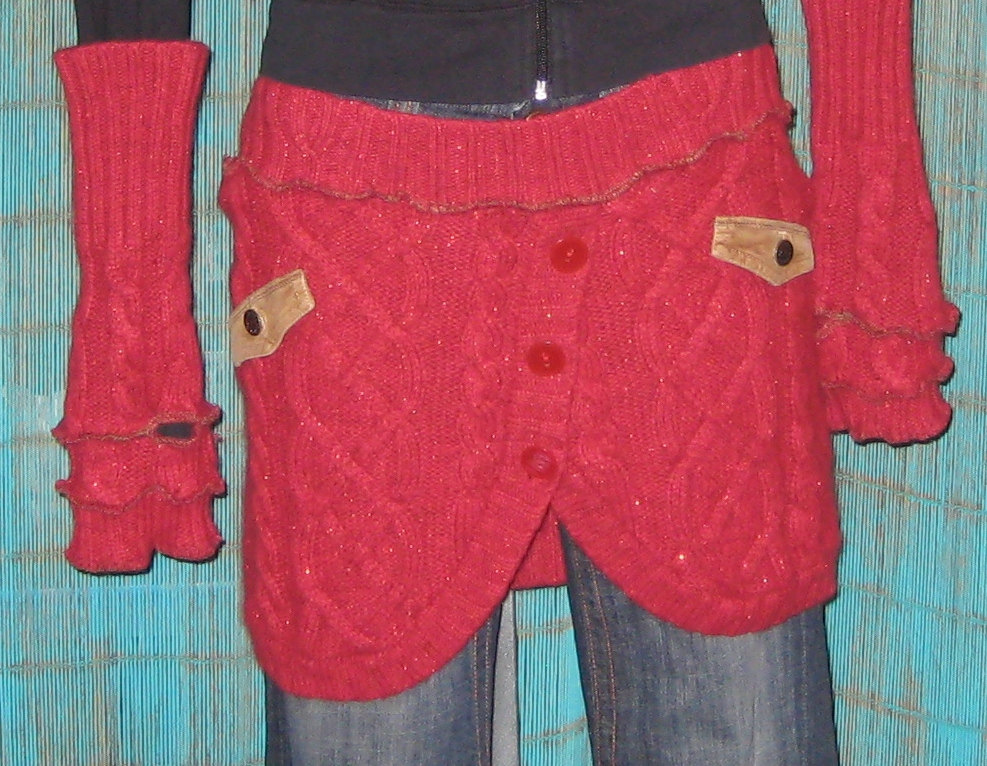
Ok, so maybe this was just an ordinary cardigan,
but who's going to wear it now???

Upcycling seems to mean one of the following:
  • Chop it off so its shorter; or
  • Add flowers or extra bits of fabric to it; or
  • Make it into something it was never inteded to be; or
  • All or some of the above.
What's wrong with letting it just be as it was?  I shudder to think of all the fabulous rare vintage clothing who's historical value has been destroyed by it being cut up and refashioned.

I don't have a problem with lingerie being dyed though, because you aren't changing the nature of the item, just its colour.

Upcycling is different to the concept of 'make do and mend' that was popular in the 1940s due to rationing of fabrics and other things.  Back then you would repair the clothing so it was still wearable, not utterly destroy it and make it into something unrecognisable.  Unless you are talking about making curtains into a dress - thats ok.

I started thinking about this whole upcycling thing when I realised it is the root cause of my hesitation to alter vintage clothing.

Recently I purchased this gorgeous 1950s vintage dress:

Its divine!  I love the bow detail on the shoulder and the full circle skirt which is lined in net to give it extra body.

Now I wasn't too fussed on the neckline.  Its kind of in a nowhere area for me.  Straight necklines on me either have to be high (like a boatneck), or low.  This middle distance doesn't really do anything for my figure.  It had a huge facing on the inside so it was able to be altered to make it look nicer - but I really wasn't sure if I should do it...

I thought about it all day as I was wearing the dress, and I realised that the adjustment I wanted to make was more in the 'make do and mend' spirit than upcycling.  All I wanted to do was make a small adjustment - it was still going to be an amazing vintage dress, and if I did it properly, no-one would even know that I'd changed it.

So I went home, took a big deep breath and changed the neckline:

Please excuse the lack of make-up.  The first thing I do is take off my make-up when I get home

I changed the neckline into a very shallow V, moving the centre down two inches or so.  I also moved and re-attached the bow so essentially it looked the same as much as possible.  I like it much better now.

So what are your opinions on upcycling?  Does it give you the heebie-jeebies too?

Beccie
xxx


Monday, December 10, 2012

So many CHERRIES!!!!

Recently a friend of mine, Renee (who is the talented lady behind Lucy Luxxe), posted a photo on Facebook of a vintage chapeau that she had purchased on Etsy.  A beautiful confection with pink and cream flowers, and leaves, and cherries!

Isn't it gorgeous!

I happened to comment that I have the perfect fabric in my stash to accompany the chapeau, and before I knew it I was making a circle skirt for her!

See - perfect!!!

Now, believe it or not, but I don't own a circle skirt pattern...  Never fear - Etsy to the rescue!!!

And happily its the correct size for me - about time!

So this is a full circle cut into four quarters, with a simple waistband.  The back of the envelope said I'd need 3 5/8 yards of fabric, and I had 3 metres... I thought it'd be pretty close, but I'd get away with it.  And I did, but not by much!

This is how much I almost didn't make it by!  Close call!!

The skirt was a really really easy sew - something you could totally make up and wear in an afternoon... apart from the fact that you need to let it hang for at least 24 hours before you hem it.  You see, because of the huge size of the pieces, some of it is cut on the bias, and the fabric stretches when gravity gets a hold of it.  If I was to hem it immediately and then hang  it in my wardrobe for a week, the hem would be all over the place!  You have to let the fabric stretch out where it wants to first.

After she knew she was going to have a totally awesome matchy-matchy outfit, Renee did exactly what I would do if I was her, and made a matchy-matchy Lucy Luxxe necklace!
Well I do do that, I just get her to make it for me!

So finally, here is Renee in her wonderfully matchy-matchy outfit, looking gorgeous!
The perfect matchy-matchy outfit!

I must say that there is only one problem with a full circle skirt...
The wind tends to get a hold of them REALLY EASILY! 

Renee has a menagerie on her property.  Meet her pony, Wizzy
Wizzy thinks he's a dog, and doesn't mind wearing hats 

I just love it when things come together and you can do something for a friend!  If you haven't already you should all go and check out Renee's Lucy Luxxe Facebook page and have a look at all the gorgeous things she makes.

Beccie
xxx

Friday, December 7, 2012

The Mermaid Tail : Final Construction Post

So I had all the pieces ready to go, I just needed to put them all together to turn them into something.

I started by sewing the beaded tail body piece to the piece of satin that was the same shape.  I then turned it right sides out and 'stuffed' the wadding in.  The idea of the wadding was to give the tail its own support so it wouldn't look so much like fabric.  I then ran a set of stitches down each side catching the wadding so it wouldn't move about (like when your doona moves over and you're left with just the cover to sleep under).

It really needs to stay where I put it...

Then I sewed the top and bottom closed.


Did I mention there was AN AWFUL LOT of hand sewing in this project.  My skills have really improved!

Then it was time to attach the magnificent tail piece... yep, more hand sewing!

By this point I had totally worn all the nail polish off my fingers...
... not really, I was just so busy I had no time to paint them!

Right!  Next job was to sew on some ribbons so the tail can be tied around anyone who wants to be a mermaid.  I figured this was the easiest way to make it one-size-fits-all.


I made sure that the ribbon was anchored through all layers in the corners and in the middle of each side, then I sewed it completely around the edges to the layer underneath it only.  I figured that was the best way to give it strength and make it pretty.  The last thing I want is one strap coming off - I've tried to make this thing to last.

I have done all this hand work on the table in my kitchen.  No we don't eat off it much...  But I'm so happy that it is there - its meant that I've been able to do all this hand work and still feel connected to my family.

Anyway, with the straps on I laid the tail out so I could check for any spots that needed more sequins stitched on.

Luckily there weren't many holes, cause I was kinda over it at this point...

Which brings me to today.

Today I have spent the day in the Sherbet Birdie studios in preparation for the shoot tomorrow.  Sasha shot the makeup artist, Lucy, and I in both outfits (yes, there is another one!) to check on poses, but to also make some beautiful photos of Lucy and I - aren't we lucky!!!  I can't wait to show you the photos - they are AMAZING!!!!!

So I will leave you with a photo of the completed tail in the studio, waiting for the lucky girls coming to shoot with us tomorrow.


Beccie
xxx