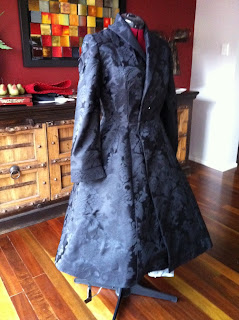
Wednesday, August 24, 2011

The black coat has its first outing!


On the weekend Mum and I went to Wahroonga to the Rose Siedler House 50s Fair! It was a great day out and we were very lucky with the weather. It looked like it was going to rain all day but somehow it didn't.

I thought this was the perfect opportunity to debut my black coat (complete with buttons thanks to some last minute efforts!). So I gathered together the bones of an outfit:
- black dress with embroidered blue swallows
- blue petticoat
- blue shoes

But I was missing a few things - like lots of accessories. Thats the thing with dressing vintage - its pretty much all about the accessories. You need to have the works and it all needs to be matchy-matchy.

The day before Mum and I wandered around Newtown looking at all the vintage and collectible shops and I found a powder blue single strand necklace which I could wrap around my neck twice - so I bought that. Then when we arrived at the fair, I found a matching pair of powder blue clip-on earrings so I bought them! THEN I found a pair of powder blue gloves, and a powder blue leather handbag! Now I had an outfit!!

So what did I do - I entered the best dressed competition!

This is a photo of my walking down the ramp from the beautiful 1950s house onto the red carpet. I was convinced I was going to fall flat on my face... a steep ramp, thats damp, in sky high stilletos. What was I thinking!!

There were 30 women in the competition, several hundred people watching, and what felt like a million photographers. I didnt win, but it was a great experience and I met some great people :)

AND I got so so so many compliments about my coat!!! Everybody wanted to know where I got it from, and then when I said I'd made it people wanted me to make them one! And I even found a photo of me on Facebook taken by a random person, with another random person commenting that I had made the coat myself!!!

I was very flattered by all the attention the coat got, and I'm looking forward to wearing more of my creations when the weather warms up. Speaking of which, I finished the pattern adjustments for the wrap dress and now I just have to cut it out and get sewing! Hopefully I will have time soon :)


Wednesday, August 17, 2011

The weather is starting to warm up (I hope!)...

...So that means its time to start sewing from my collection of 1950s dress patterns! Hooray!!

This is the pattern I chose. Pretty isnt it! This is a beautiful wrap dress from the designer Marian Martin. This is a mail order pattern sent out to the original purchaser in the 1950s. Unfortunately I can't find any information about Marian or the company to add here - it seems to be lost to history, what a shame!

What I can tell you is that the pattern was purchased my whoever originally purchased it (lets call her Miss X) and then she never sewed it! Seems sad doesn't it. This means that the unprinted pattern pieces were still factory folded.

For those used to sewing with modern patterns, uprinted pattern pieces are totally different from modern patterns. Modern patterns come in big sheets printed with the bits you need to cut out and use, and they have a range of sizes. Old unprinted patterns are already factory cut and have no printed markings whatsover, just a code of holes which I have yet to figure out, and only come in the one size.

Once again, because I loved this dress I had to buy the pattern even though it was too small for me. So this requires pattern alterations! I swear, this kind of sewing is such a labour of love!

So for me STEP ONE is to unfold the factory folded pattern, and then iron on some really light unwoven interfacing (at this point all the collectors will be screaming NNNNOOOOOOOOOOOOOO) but tough to you guys. This is the best way to sew from the pattern and not damage it. I am preserving it for future use - so quiet!

Then STEP TWO is to cut out the original size pattern on the lovely cheap pattern tracing 'fabric' (It feels like its made from recycled PET bottles...) and then pin it together to see how badly it doesn't fit :)

STEP THREE is to increase the size of the pattern pieces where needed. For this one I just had to increase the size of the front bodice and then therefore the halter neck strap.

All this would not be possible without the help of my dressmakers dummy - lets call her Doris (a good old 1950s name!). Doris is set to be the same size as me so this means if it fits Doris, it will fit me!

I'm pretty happy with it and I think it will look great. There is another change I'm going to make though. The skirt on the original pattern is a big rectangle thats gathered. I'd prefer to have more of a swing style gored skirt, so I will be drafting my own skirt pattern from a skirt I already own to attach to the bottom of the bodice.

Hopefully I will get to do some work on the skirt pattern tonight, and then I might even get to the cutting out stage! That has to be the most exciting part for me, to see the fabric cut out and prepared.

Fingers crossed!!!

Tuesday, August 16, 2011

So the black coat project lead me to...


... make a LEOPARD PRINT one!!!


Those of you who know me know I can't resiste leopard print! I did make one significant change with this coat though. I didn't want to make another swing coat because I wanted to wear this coat with this wiggle dress:

(Isn't this a cute picture of moi!! This is from my photoshoot with the wonderful girls at Sherbet Birdie where I became a pin-up model for a day. I had a fabulous time having my hair and make-up done, eating cupcakes and drinking champagne, then I had 9 amazing photographs taken and I now have something to look back on when I'm old and decrepit and remember how how I was when I was 32!)

So anyway - back to the sewing!!!

I changed the pattern into a straight skirt and lined the coat in lovely red satin. Its not perfect (none of my sewing is) but I'm pretty sure I'm the only one who can see the flaws :)

And I must say that easing the sleeves in this coat was about a thousand times easier - something to do with the fabric I think, it just seemed to squish up better.


Oh, and these are the buttons I purchased from Etsy. I really like putting vintage buttons on my sewing, and these ones came from The Corner Mouse.

Putting the buttons on was where the nightmare started. Luckily the biggest button hole the machine could do was just big enough for these buttons (once again I had started sewing this coat before I found out about bound buttonholes), but everytime I tried to do a buttonhole on the fur the thread would break or the machine would have a fit. It was getting all to much for me - I was sick with an earache and I needed to finish the coat that day to wear it the following day to Greazefest. I had to call my mum. She worked out that the tension was too tight for the fabric (whats tension??) and once that was changed the machine sewed the buttonholes like a warm knife cutting through butter!


Unfortunately I don't have any photos of me wearing the coat. This is because by 9.30am in Brisbane that day it was about 25 degrees celcius and far too hot to be wearing a leopard print coat... what a shame! Oh well, there is always next winter!

Thursday, August 4, 2011

The Trouble with Buttons

Buttons - I love them but they can cause problems. Take these ones that I have pinned onto my coat for instance.

I purchased these vintage buttons on Etsy from LakeViewArts and they are beautiful and just what I wanted BUT they are too big for my automatic button holer on my sewing machine.

(By the way, these buttons aren't bronze like they look in these photos - they are actually black and very very shiny. And the fabric is much more black, and less grey...).

What to do now???

As far as I can see it there are two options:

1. I do the buttonholes by hand. This involves lots of finicky hand sewing and the end result will be a buttonhole that (more than likely) will look crap; or

2. I use the machine to do the stiches like the automatic function. This is harder than it sounds. I had several trial runs at it the other night and none of them turned out satisfactorily. Sigh!

It seems I should have done a bound buttonhole back when I started making the coat. I've never heard of bound buttonholes before until I found this tutorial today from Sewaholic. The end result looks very nice and finished, see:

But alas its too late now. You know it probably said something about bound buttonholes in the sewing instructions, but to be honest I didn't read them much because they weren't that much help... I kinda just made it up as I went along.

Any-hoo!

There is one way to solve this conundrum and thats to get more buttons - smaller ones - that can fit in the automatic buttonholer thingy on the sewing machine... I am yet to make up my mind on this. I think I need to do some more experimenting before I make a decision.

Wednesday, August 3, 2011

My First Sewing Effort

So here are a couple of photos of the coat that I sewed - my first effort at sewing from a vintage pattern. And not only that but it was my first attempt at adjusting a pattern to fit me! I'm pretty happy with the way it turned out.

I made it from curtain material believe it or not (not the rubber backed stuff) and put in a 5mm think felt lining in the bodice to help keep me warm. The whole thing is then lined in lovely sky blue satin.

I have yet to put the buttons on though... the vintage buttons I bought on etsy are too big to fit in the automatic buttonhole foot on my sewing machine. This means that I have to work out how to do them manually with the sewing machine or do them by hand (yuck - don't like hand sewing!)

Tuesday, August 2, 2011

Welcome to my blog!

Well isn't this exciting!

This blog will detail my adventures with my vintage patterns and my sewing machine.

I am a devotee of 1950s fashion and dress accordingly - lots of high waisted pencil skirts, full circle skirts, capri pants, gorgeous dresses etc etc. Recently I remembered that I could sew (haven't done so for about 10 years) and decided to purchase a couple of authentic 1950s patterns and have a go at making my own creations. It has been an interesting journey so far and I would like to share it with whoever is interested.

While I say that I remembered I could sew... I could never sew REALLY well. But there is nothing like throwing yourself in the deep end and seeing if you can swim! The photograph on the right underneath my banner shows the first patten I decided to undertake. A beautiful circle skirted fitted coat from a 60 year old pattern that was too small for me ... see what I mean about deep end! This was my first project after more than 10 years of not sewing! And you know, it took me a couple of weeks, but it came out so well that I made another one! This time I changed the pattern so it was a straighter skirt, and I made it out of faux fur. And now I am addicted!!!

I'm looking forward to sharing my sewing adventures with the world :)