Friday, March 20, 2015

Capelet Sewalong : Part 7 : Putting the Elements Together - and GIVEAWAY!!!

Wow - we are on the home straight now!  In this post we will attach the cape to the bodice, finish all the edges, and attach the buttons.  Lets get started.

If you don't have the circles showing where to attach the cape marked on your bodice, mark them now.


This is the line where we will attach the cape.  But before we can do that, we need to prepare it.  Remember that portion of the front of the cape where we stitched a line on the seam line rather than within it?  Well, we are going to use that stitch line as a guide to iron the flap under.


I'm using plenty of steam to maintain the slight curve.  There is also one more thing we need to mark - the space that becomes a button hole.  Rather than marking it with chalk, I am going to use pins.  Remember that this is a guide to where the button hole should go, not the size of the button hole.  If you can't remember how wide to make the gap, measure one of the bound button-holes you made earlier.  (I sure can't remember!!!)


Also, remember that if you need to increase the size, you need to make sure the button-hole itself is still centred in the same spot.   My buttonhole needs to be 1.5" rather than 1", so I have added half an inch to either side.  Transfer your marks to the lining side of the cape.


Now to stitch the cape on!

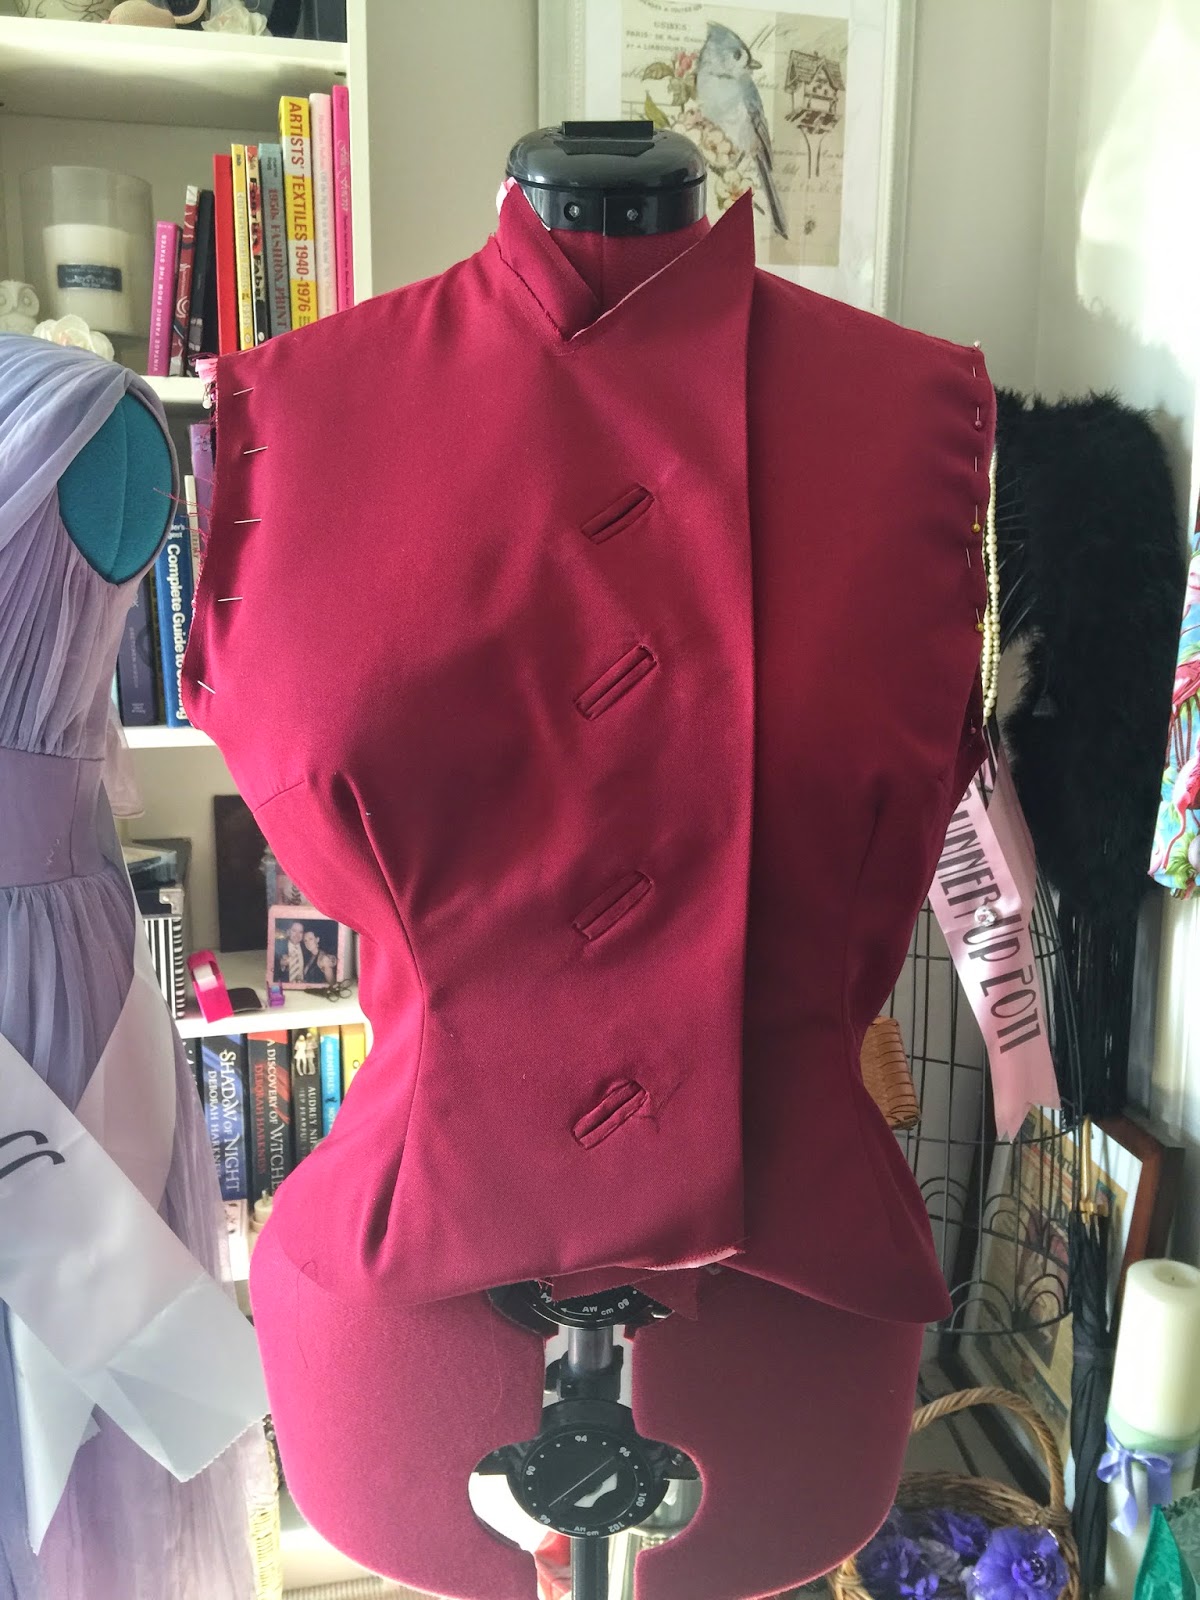
With the right side of the bodice up, and the right side of the cape down, line the pressed edge that you did earlier with the marks you made on the bodice.  Fold the flap out and pin the cape on.


The final mark on the bodice should line up with the end of your fold line.

Make sure that when you are pinning the cape on, the lining is nice and neat underneath, and the attached facing is out of the way.  Oh, and the line of stitching is going to be visible on your bodice lining, so maybe change the bobbin thread to a matching colour - thats what I'm doing anyway.

By the way - have fun man-handling this through your sewing machine...


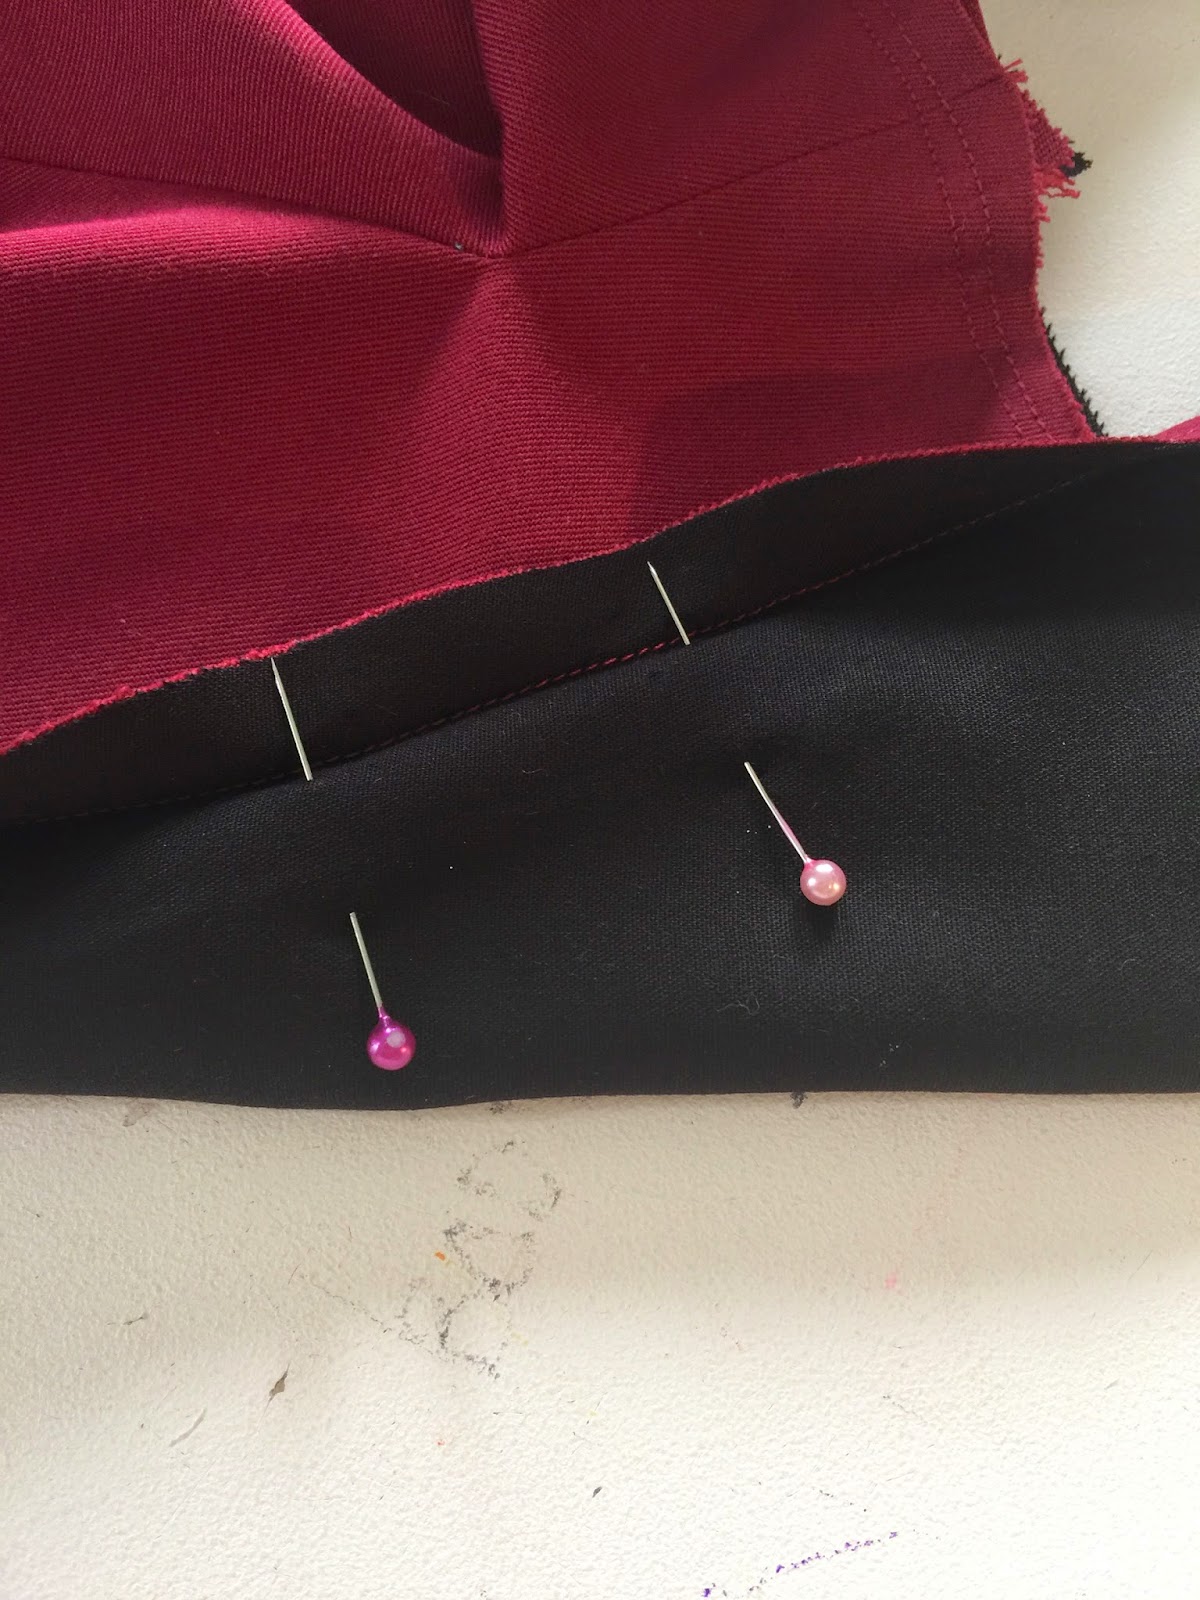
Use the line of stitches you made on the capelet as a guide of where to sew - but sew just to the left of it so the line of stitches don't show when you turn it the right way up.   And don't forget to leave the space for the button hole!!!

Phew!  That was some stressful sewing!  How did you go?

Next job is to do the collar facing.  Take the collar facing pieces (called neck pieces), and sew the fronts to the back, clip the corners and press.  Make sure to mark the button-hole we need to leave open onto the front piece.


So that we have a finished edge when we turn it right way out - put some bias tape along the bottom edge.  Leave plenty of excess bias overhanging the edges.  It will help you later.


Pin the facing onto the neck/collar area of the capelet.  When pinning it on, you will be pinning along the top edge of the attached facing, then along the top edge of cape collar, then back along to the top edge of the opposite attached facing.

At the point where the attached facing becomes the front collar we will be pivoting around a corner.  That pivot point needs to be as close as possible to the seam line where the cape is attached to the point of the bodice.  I have marked that point with a chalk mark, and have pinned the facing accordingly.


(You will notice at this point that I am swapping to my other capelet.  Thats because I made a bit of a boo boo, and constructed the capelet the hard way.  I want to show you the easy way, not the hard way, so I've switched to my other one.  Oops).

Take a deep breath and sew the facing on (remembering to leave the button-hole open).  Clip corners and thick seams, and turn through.


Pin the facing down around the back of the neck, and now lets deal with the facings down the front.  We are simply going to put bias on the edge of the facing so we can hand sew it to the lining later.


To finish the bottom of the facing, press the bodice front up, then lay the facing over the top and match up the bottom to the fold line.


Well thats the last thing you need to sew with the machine - now its time to hand sew.  All the facings need to be sewn down, you need to hand sew the bound button-hole windows down, and sew the buttons on...

AND THEN YOU'RE FINISHED!!!!!


When I have finished all the extra hand sewing I gave myself on the gaberdine capelet, I will update this post with photos of it too.

I'm kinda thinking that about now you are wondering about the GIVEAWAY portion of this post - well, if you send me a photo of your finished capelet before midnight on Monday the 6th of April (yes, you have all Easter to sew if you want to), you will go into the draw for a

$50 DECADES OF STYLE VOUCHER!!!!!

I will announce the winner when I post the round-up showing photos of all of us wearing our glamorous creations.  So get sewing ladies!!!

Beccie
xxx

Tuesday, March 17, 2015

Capelet Sewalong : Part 6 : Cape Construction

We are almost there!!!  This post won't be as long as the last one, but you will recognise many of the things we did in the last post being done in this one.  First up we have one more tiny little chore to do.  We need to make some hair canvas pieces for the collar.  It will give the collar shape and help it stand up.

First step is to approximate pattern pieces from the cape pattern pieces.


You can see that I have drawn yellow lines on my pattern pieces.  This is where I'm approximating the base of the collar is, and where the hair canvas should finish.  Cut the hair canvas, and trim it down 5/8" on the sides where there will be seams, just like we did earlier.


Then we need to sew bias onto it like we did earlier.

(yes, that is different fabric.  I forgot to take a photo of my gaberdine cape when it was at this stage)

Now we can sew it to our cape pieces like we did with our bodice pieces.  Remember to keep your line of stitching in the seam allowance so it won't be visible in the finished garment.

Pin the cape fronts to the cape back along the side seams, and sew.


Then clip the corner where the collar turns into the shoulder and press the seams.


There is one more thing we need to do to the fashion fabric side of the cape - as suggested by Janet at Decades of Style.  The corner where the cape stops being sewn to the bodice and starts hanging free can have quite a bit of stress on it, so we need to reinforce it

Grab some iron on interfacing, and take out one of those tiny scraps that you were sure you would use at some point (hint: the time is now!) and cut two circles about 1.5" or so in diametre.  Then mark the clip line from the pattern onto the fabric.


Iron the interfacing circle on to the fabric so that the centre of the circle is over the end of the clip mark.  You will then need to remark the clip mark.


Ok, so thats the outside part of the cape together.  Lets do the lining.  Pin the fronts to the back just as you did before, sew the seams and clip the corner.  Then take the facing pieces you made for the cape and sew them together, like we did for the facing pieces for the bodice.


And, as we did for the bodice, sew your bias to the right side of the facing piece, at the top.


Then pin it on to the right side of the cape lining, at the hem.


And sew it to the cape lining, but make sure to do it within the seam allowance, so its not seen in the finished garment.  Then sew another line along the bias tape - but do it neatly, because this line of stitches WILL be seen in the finished garment.


Now we need to pin the lining piece to the outer cape piece.  Put them right sides together, and pin from the interfacing circle, down the side, across the bottom of the cape, and back up to the other interfacing circle.


Our line of stitching needs to start on the end of the clip line, and run around and finish on the end of the other clip line.  Make sure you pivot in the corners.

Clip the clip lines, curves and corners, then turn through so the right sides are out.  Press.


One more thing and the cape construction is finished!  Pin the lining to the cape the rest of the way around the edge.  We are going to sew around that edge to secure the lining to the exterior.  In all other cases when we have done this before, we have sewn within the seam allowance.  We aren't going to do that this time.

The front edges of the cape - from the clip line up to the point of the collar - will be sewn right on the seam line.  The remainder (around the collar) will be sewn within the seam allowance.


Right!  Thats it!!  The cape is made!!!  Guess what that means - the next post will be putting them both together and we will be finished!!!

Beccie
xxx


Saturday, March 7, 2015

Capelet Sewalong : Part 5 : Bodice Construction

Right!  Lets sew something!!!

Sadly that something is darts.  The ones on the bodice fronts, and the bodice back.  Lets get them out of the way shall we.

By the way, if you have done a waist dart, you might want to clip the middle like I have.  I have also split the dart so I can spread it to each side like a seam when I iron, to distribute the bulk.


I really really dislike sewing darts.  I can't tell you why!  Its just a sewing chore that I really really can't stand.  I don't mind telling you that I procrastinated an awful lot sewing these 8 darts.  It took me over an hour and a half.  I think that might be some kind of record!

But their done now - so on with the sewing!

Grab your finished hair canvas pieces and line them up with the bodice fronts.  Every side where you attached bias, machine sew the bias to the bodice front WITHIN the seam allowance so the stitching won't be seen later.

You will then need to do a little bit of hand stitching to secure any dart flaps that sit over the top of the hair canvas.


Pin the bodice front pieces to the back and the shoulders and the side seams, and then sew together, and press.

Now we can move on to putting in the lining.  Take your front bodice lining pieces start by sewing the darts.  Then take the back bodice piece.  As well as sewing the darts, there are extra lines that need to be sewn, since we positioned the pattern fold line 1/2" from the fold of the fabric to allow for movement in the lining.


From the neckline, sew a line of short stitches half an inch from the fold, down 2.5".  Then do the same thing from the hem, up 2.5".  I'm using a stitch length of 1 so its strong.


Here is the hem of my lining pieces now the darts and the extra lines have been sewn and I've pressed it

(its all blown out cause my lining is black)

Then sew the front and back bodice lining pieces together at the sides and shoulders.

Ok, so now we are going to attach the facings to the lining, before we attach the lining to the bodice.  I'm going to do mine so it looks all pretty, using some lovely matchy satin bias.

First job is to sew the front bodice facing pieces to the back bodice facing piece.


Then attach the bias to the facing along the top edge of the facing on the right side.


Now we are going to attach the facing piece to the lining.  Pin it down along the bottom edge.


Don't worry that the facing piece isn't quite as long as the lining piece...


The first step to attach the facing to the lining is to sew along the hem, but within the seam allowance.  We don't want this line of stitching to be seen in the finished garment.  The second step is to sew along the bias - obviously this is going to be seen, so make it neat!


Now for the fun part - lets sew the lining we've just finished to the bodice we made earlier.  Turn the bodice right way in, and then with right sides together, pin the lining to the bodice along the bottom edge, and sew.

Clip the curves before turning through and pressing.


With the bodice turned through, pin the lining to the neckline, and the arm holes.


We won't be covering the neckline with facing for a while yet, so in the mean time, secure the lining to the bodice by running a line of stitching within the seam allowance so it won't be seen in the finished garment.


Now we need to deal with the arm holes.  This is the way they will be permanently finished, so it needs to be pretty.  The instructions that come with the pattern say to use bias strips from your fashion fabric.  But I'm going to use the bias I used earlier, I've just ironed out one side of it.

Pin the bias to the right side of the arm hole, making sure you have all the layers together.


Sew the bias on - I used the fold line of my flattened bias as a guide.


Then fold inwards and hand sew the bias down.  (I've pinned mine to hand sew later).


Thats it!  The bodice is done!  The unfinished edges will be finished later after the cape is added.


Don't you feel great that you now have something that looks like a capelet!?!

Beccie
xxx


Thursday, March 5, 2015

Capelet Sewalong : Part 4 : Hair Canvas the Cheat's Way

Now you've conquered bound button-holes (or not, depending on your choice) its time to look at something else you might not be familiar with - hair canvas.

If you've elected to use iron on interfacing, use the pattern piece included with the pattern.  If you've done the bound button-holes, just cut rectangles out and fit them over the top of the stitched in bits before you iron.

If you are going to have a crack at hair canvas, follow me.  Now I've done this the right way before and hand stitched everything, but I'm about ready to speed up the process and cheat a little bit.  I mean, hand sewing is great, but, yeah....

So we need to use a modified version of the bodice pattern piece to cut the hair canvas, so lets make the new pattern piece first.

I folded the attached facing down, and I've traced around most of the pattern.


You'll notice that there is a chunk missing.  The hair canvas is predominantly to support the shoulder and the centre of the jacket.  So its cut in around the top of the bust dart, and the inner side of the waist dart.


Its hard to see, but I hope you get the idea.

But we aren't done yet.  The hair canvas cannot be in the seam allowance, so we need to trim the pattern down by 5/8" on all the sides that have a seam allowance - slightly more than the seam allowance for safety.


There you go!  Now cut your hair canvas!


Next step is to prepare the hair canvas.  It is traditionally hand sewn in with bias, like this.


But trust me when I say it, this takes a long time.  Instead, we are going to use bias to give the hair canvas a seam allowance we can use.  I'm just using a normal packet of 1/2" binding, but I'm ironing the creases out.


Take one of your bodice pieces, and one of your hair canvas pieces, and lie the hair canvas on the bodice pieces it should go.  More than likely you will need to trim it so it fits exactly (I did!).  Also, if you've picked the piece with the bound button-holes, you will need to cut rectangles to pull the button-hole squares through.  Here is what mine looks like now its all trimmed and in place


Now take your ironed flat bias, and put it underneath the hair canvas so it lines up with the edge of the fabric, then pin it to the hair canvas. 


Don't pin through the fabric underneath, just the hair canvas and the bias.


Now we can machine sew the bias onto the hair canvas.  This is more than likely going to blunt your needle, so you may want to swap it out after this.

Repeat for the other side and hooray, you're done!


Next up we will be doing something a bit more exciting.  We'll stop doing all these annoying tasks and actually get on with making our capelet!

Beccie
xxx