Thursday, November 27, 2014

Origami Pockets!

Recently, while trawling my favourite buy sell swap group on facebook, I saw a dress with the most amazing pockets! 


I wasn't quick enough to buy the dress, but I screenshotted the images so I could drool over the pockets later.  They have been described as 'pocket porn'.  And I figured, why not share the love and post a pattern and a tutorial so you can make your own!

So here is the pattern - and I remembered to put in a 1" square... HOORAY!!!  I have scanned in my A4 paper pattern, so I think you could right click on the picture and save them to your computer, and then print them out.


I have written instructions on the pattern pieces of what to cut.  If you don't want to have a different colour for the lining, just cut them all out of the same fabric.

Step One : Pocket Front

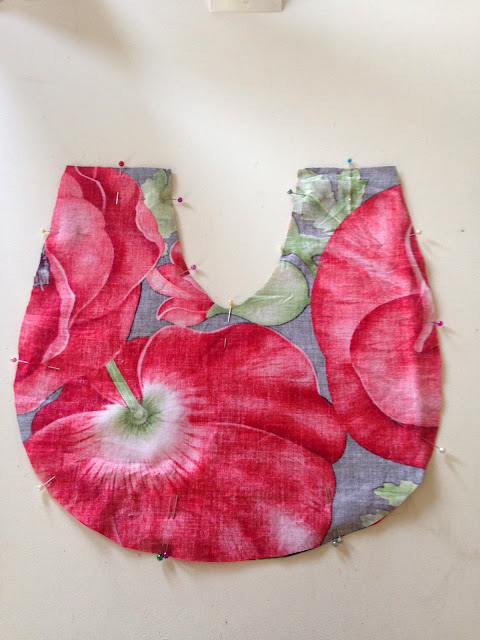
Take your pocket front pieces and pair them up right sides together.  Sew along the top seam.


Turn the fabric right side out and press.  If you want, run a line of top stitching along the fold.


Step Two : Pocket Lining

Next job is to sew the pocket lining pieces together.  Now I chose to do mine in chevron stripes but do yourself a favour and choose something plain unless you want to give yourself a headache.  Sheesh!

Sew them together down the long side and press open.

I only worried about matching the stripes at the top of the pocket lining, because thats the bit that will be seen.

Step Three : Pocket Back Preparation

These bits aren't sewn together like the pocket lining.  Instead, take the pieces to your ironing board and iron the 5/8" seam allowance along that long side to the right side of the fabric.


Step Four : Construction

Ok, for this to work when you turn it through, you need to treat the pocket lining and the pocket front as one piece.  Lay the pocket lining down and then place the pocket front on top.  Pin it together.


This next bit is up to you.  I hate that nasty gritty ugh that accumulates in the corners of pockets.  This is going to have a deep pointy bit where god knows what could end up.  So I am going to sew a line 10" down from the top of the pocket front across the point of the pocket.


Then lay the pocket backs on top and pin them down.  Make sure the seam allowance you ironed in is pinned out of the way so you don't sew it in the next step.


Sew the sides together.  Start and end your line of stitching on the fold line of each back piece.  Don't sew over the opening (ie, sew each side separately).  Then clip the corners in preparation for turning it right side out.

Ignore the fact that my seam allowances are folded the other way.  Its a bad idea.

Step Five : Turning the Pocket Through

Turning the pocket through and attempting to iron it is really going to make it feel like origami!


I found the best thing to do was to make good use of the pointy end of my ironing board.  If you have one of those fancy sleeve pressing thingys you will probably want to use it.  But keep at it and you will get it all neat.


Step Six : The Button

I chose to make two large buttons covered in the lining fabric to add to my pockets.  They are really quite easy to make!  The ones I used were metal and had little teeth to grip onto the fabric - simple! 


Regardless of whether or not you make your own button, sew it on now while there is less fabric to deal with.


Step Seven : Attaching the Pocket

This bit is the fiddliest bit of the whole process.  This pocket needs to be inserted on a seam line.  You can put it so the top of the pocket is in the waist seam, or you can place it further down the skirt.

Flatten the pocket out so the pocket back seam allowances are together, and pin it to the right side of one of your skirt pieces.


Then lay your other skirt piece over the top and pin again - pinning down the length of the seam you need to sew.


I paid really close attention to the points of the pocket at this stage, making sure that they would be in the right place when the seam was ironed flat.  Trust me, its worth putting in the extra time.

Then open the skirt out and iron it  all flat!


YOUR DONE!!!

I haven't finished the rest of the dress yet to show you what they look like on a finished garment, so instead here is a mock-up so you get the idea.


I hope you like these pockets as much as I do!

Beccie
xxx

Saturday, November 22, 2014

Swirl Sew-along : Customising your Swirl

There are a few easy ways to customise a Swirl - there are simple things like embellishments and pockets, but you can also go one step further and change the neckline.  In this post I'm going to cover three different necklines that are all based on vintage Swirls. 

Variation One : V Neckline

This is probably the simplest variation to make.  You only have to draw one line.


From the point of the existing neckline where it meets the shoulder seam, draw a line (with a ruler) down to the top of the top trim line at the bodice centre front and cut the new neckline there.  Its tempting to draw the V lower, but don't forget that you have to take the seam allowances into account, and it will be lower than where you have cut the fabric.

You also need to make a new front facing.  Once you have cut your bodice front, use the bodice front to make a new facing but cutting it apart!  The shoulder facing piece is 3" in width, so mark a point 3" from the neckline point at the shoulder seam, and 3" from the bottom of the V at the centre front.  Draw a line between the two.  If you are planning on using bias to wrap the raw edge of the facing, you will need to make a rounded line at the centre front facing.


Variation Two : Rounded Neckline

This is also very simple, but is a bit more annoying because you have to draw a curve rather than a straight line.  To work out the diametre of the line you need to draw, continue the line of the bodice facing from the centre front up, and from the shoulder seam across, meeting the centre front line at a right angle (90 degrees).


Then, take a compass (I had to 'borrow' one from my step-son's school pencil case) and widen it so the pencil point and the pointy point are as wide as the gap from the shoulder point to where it meets the centre front line.


Using that width, draw an arc from the shoulder seam around to the centre front seam.  This is your new neckline.


Once again, use the bodice pattern to make a new bodice facing. I use my tape measure to draw lots of small lines 3 inches from the curve, and then I join them all together.


Variation Three : Gathered Round Neckline

This one is the most complicated of the variations because we need to use the slash and spread method to get the space at the neckline to gather.  The first thing to do is to create a round neckline using the method above.  And you will also need to make a pattern for a facing at this point, but do it without cutting up the pattern you made - trace it instead.

Then, draw radiating lines at even increments (I used 3.4") from the neckline outwards like this.


Note how I have avoided the waist dart - its too difficult to put back together...

Then cut down the lines you have drawn from the neckline, leaving just a little bit at the end to act as a hinge.


Then, put a supporting piece of paper under the neckline, and space the slashes evenly (I used 1/2"), taping them down as you go.  The edges of the arm hole, side seam and waist seam will buckle a little bit, but not so much that the pattern piece becomes unusable.


The only other thing you need to do is just adjust the bust dart.  You can see the bits that I have redrawn in the picture above.

Then continue on constructing your swirl bodice as before, and when it comes to the neckline, run a gathering stitch inside the seam allowance and use the facing to see how much you need to gather.

So that's it!  The best thing about this pattern is that it is a brilliant base for adjustment and personalisation.  Don't be afraid, dream up something and have a go!

Beccie
xxx

Saturday, November 15, 2014

Swirl Sew-along : Part 6 : Adding The Skirt, And We're DONE!!!

In the last post, we completely finished the bodice (hooray!) and attached the pockets to the skirt front piece.  Lets continue!

Since we were last working on the skirt front, lets continue there by doing the pleats.  You will have marked them up in one of our earlier steps.  Its as simple as bringing the lines together:


And sewing along it!


Then press it towards the centre, but only press the bit that has been stitched.


Next, sew the skirt backs to the skirt fronts, then press the seams open.


Well, now (obviously) we have all the skirt put together, and at this point I always like to do the hem before I attach it to the bodice.  Mainly because there is less fabric to have to manipulate later, but also because when you attach the skirt to the bodice its finished!

So lets look at the hem first.  If you haven't already, cut it to the skirt length you want plus 1 5/8 inches (or 2 if you are lazy like me!).  I like my skirts to be a bit longer so I can wear them with heels, so I have cut 4" off the length making it 29", so by the time we take the seam allowance off, and fold up the hem, the skirt will be 27 3/8".


But before we fold up the hem we need to sort out the raw edges on the skirt sides.  A lot of you ladies noticed the skirt back facing on the original layout pictures I posted in Part 1, and wondered where they were.  None of my original swirls have a back skirt facing, so why should we!  We will be doing a narrow hem instead.

First step is to do a 1/2" fold.  I do this with the iron in one hand and my tape measure in the other to make sure my fold is 1/2" the whole length.


Oh!  And here is an awesome tip I learned recently.  Turn the steam off on your iron and you won't burn your fingers!!  You have no idea how excited I was when I read that, and then I wondered why it had never occurred to me - haha!

Next step is to turn the raw edge under to the fold line you just made.


Then its as simple as running a line of stitches near the edge of the fold!


Then repeat the same process for the hem, but use 1" instead of half an inch!

Now, parts of this hem aren't going to be so easy because its curved.  Use plenty of steam and you should be able to ease it flat(ish).

There is one last piece of stitching that we need to do before we sew the skirt to the bodice.  That is the line of gathering stitches on the skirt front.  It needs to run from the pleat to the side seam on each side.  Set your machine to the longest stitch it has, drop the speed, and sew a line that will be within the seam allowance (say, at a foot width) and another one beneath the seam (say at 1 1/2").


You might wonder why I've suggested to run two lines of stitching.  Well, I used to only run one and every time I sewed it to something the gathers would be uneven, or they would get caught up in my stitches - basically it drove me INSANE every time.  But if you run two lines, your gathers are neat and stay out of the way!  Hooray!!

Ok, the last bit.  Are you ready?  We are going to sew the skirt to the bodice!

Find the centre of the skirt front and the centre of the bodice front and mark them by making a little crease with your iron.  I do this by putting the two pleats on the skirt (and the darts on the bodice) together and ironing the fold.


Line up those little folds and pin to them together, then pin the darts to the pleats and put some pins in between to make sure any excess is eased in.

The next thing to pin is the side seam of the bodice to the side seam of the skirt.  You will have heaps to ease on the skirt, and that is where the gathering stitches come in!


I do the two rows at the same time, so pull the tail threads (I can never remember which ones!) of each line until the excess fabric is eased, and then distribute the gathers equally and pin together.


Repeat for both sides.

Then last of all, pin the skirt to the bodice back.  Make sure that you don't pin the bodice facing in!


Then sew the skirt to the bodice!!!  I am going to pink the seam, like I've pinked all my other seams, but you could also bind it with bias.


Then press the seam up.  Also, press up the bottom of the bodice facing.


We are on the home straight now!  Pin the facings back  at the waistband.  Then hand sew them in place. (notice that this is the only piece of hand sewing in the entire project.  Nice isn't it!


Then the final job is to remove the second line of gathering stitch.


Congratulations, you have made your first 
SWIRL DRESS!


Now, if you are anything like me, it will not be your last.  You will quickly become addicted to making them, as there are endless options for personalisation.  You will also become addicted to wearing them because you will look put together and stylish with absolutely no effort whatsoever.

Thank you for sewing along with me.  I have loved every part of this process, so I know there will be more to come in the new year.

Much love to you all!

Beccie
xxx

PS.  I will be doing a round-up post in a couple of weeks, so if you would like a photo of you in your Swirl dress included in that post, email it to me at sewretrorose(at)gmail(dot)com by the 30th of November.  Thanks!!!

Thursday, November 13, 2014

Swirl Sew-along : Part 5 : Bodice Facing and Pockets

In our last post, we put our bodices together.  Now we finish the bodice!

Get the three bodice facing pieces (one front, two back) and pin them together like so:


Sew along the shoulder seams and press flat.  You will have a shape that looks like... a bottle opener!


The inside edge will be sewn to the bodice you've made, but the outside edge won't be sewn to anything and is therefore prone to fraying and getting ugly.  You could just use your pinking shears to cut the zigzaggy lines so the fabric won't fray, or you could put in a bit more effort and bind the edge with bias.  And thats what I'm going to show you now!

Get your bias tape, open one side, and pin it against the outside edge on the wrong side of the fabric like this:


You can pin it all the way around if you want, but I find it just as easy to hold it against the edge as I sew, so no need to pin.

Sew the bias to the facing next to but not on the fold line in the bias.


It can be a bit tricky to go around the curves, but you can do it!  Just take it slow and ease the bias around.  But we do have two corners that we can't go around.  Just finish it off at those points, and do the other long side.


To finish binding the raw edge, refold the fold you stitched near, and then fold the bias in half over the raw edge.


Then sew in a nice neat line near the folded edge!


Trim the ends off and then repeat the process for the short edge of the front facing.  You can leave raw edges of bias on the ends because bias is cut on the diagonal and won't fray!  Your facing will now all be edged and neat!


Now to sew it onto the bodice.  I like to start by matching the front up, so pin the front facing on.


Then I work my way down one side, and then the other so its all pinned together.  Now you can sew the facing to the bodice.

But before we can continue by turning the facings right side out, we need to clip the corners and the curves so they lie flat.


Once thats done, you can turn the facings and press the seams.  Hooray!  Your bodice is done!!

No, wait, there is one more thing - the buttonhole.

Find the points for the buttonhole that you marked from the pattern.  The buttonhole will be made on the left back bodice piece (as you look at the bodice)


I am going to use my machine to make the buttonhole, so I won't talk you through the process because each machine is different.  Just make whatever buttonhole you are going to make in that spot.


Then sew on your button


and your bodice is FINISHED!!!


Please note how high the bodice sits at the back - some of you that might think you have gaping bodices might not have gaping bodices...

Now for those that are making Pocket 2, this is how to go about it.  Get out your pattern pieces and lie the pieces in pairs, right side together, and pin them.


You will see that I've put double pins in two places at the bottom of the pocket.  That reminds me to stop stitching there so I can leave a spot open to turn it through.  Stitch both pockets and clip the corners and curves.


Turn it through and press it nice and flat.  Once again I used my trusty bbq skewer to get all the points and edges nice and clean.


If you want, you can leave it like that, it will be just as functional BUT it never hurts to have more decoration!

Take some bias tape, and using the method explained above, run it around the centre of the U shape.

You see that X of pins - thats to remind me which way is the front

Make sure to leave the tails of the bias a little long - you will need them long to make the finish neat.

Now that we have both styles of pockets made, we can attach them to our front skirt piece!  I have used pins to show me where the ends of the line we marked are.  Find the centre of this line and mark it with something - a pin is best.

I have used a chalk pencil here, cause it will be covered.

Centre your pocket on that point using whatever you need to make sure it lines up with the imaginary line between the pins.  Note that with Pocket 2, the two inside corners sit together, not apart.


For Pocket 2, neatly fold the bias under and pin it, then pin to the skirt piece.

For Pocket 1, line your pocket up along the line you marked on your fabric.

For Pocket 2, make sure the outside points of your pocket are the same distance from the top edge as each other.  That goes for both pocket styles.

Sorry - a bit blurry....
Note that the outside points of Pocket 2 will sit a little higher than the centre points

Now make sure the edge of your pocket sits neat and flat around its edge, and pin it in place.


As you pin the pocket down, make sure that it is an inch or more away from the edge.


And then its simply a matter of top-stitching it on!

Note that with Pocket 2, you also top stitch across the top of the pocket, leaving only the biased edge open.


Done!  Now pat yourself on the back and have a cup of tea, or a glass of wine.

I think I'll have wine.

Beccie
xxx