Showing posts with label efficient insanity. Show all posts

Thursday, July 18, 2013

COATS : The Lilac Coat Goes Out!

I know you have all been waiting for this post - so here goes!

Last Sunday my family and I went out to our favourite breakfast spot (breakfast is my favourite meal to eat out) and I thought 'What a fabulous opportunity to wear my lilac coat!'  Luckily, my step-daughter just LOVES being my photographer.


You will have to forgive me my shoes.  Its winter but I don't have any close toed shoes that go with lilac.  But you can FINALLY see the real colour of the fabric and the fact that the buttons do match it!!!


I do however have an adorable vintage beret which matches the colour of the coat perfectly!  And the extra inches I added to the skirt pieces have made coat extra swishy (if a coat can be swishy).


And I'm really happy with the placement of the pockets!  They are in a really comfortable place to put my hands in - not to mention warm!

And here is my lovely family:


To everyone who has quietly wondered if my family is into vintage too - they aren't.  Its just me.  I stand out like a sore thumb!  On the left is step-daughter Livy, then step-son Zane (who refuses to have is hair cut) and then my lovely hubby Steve.

Our favourite breakfast place is at a nursery.  It is lovely and quiet, which the most relaxing atmosphere.  And they have wonderful tea and amazing food.


Here is a photo of my breakfast.  Lightly spiced creamed corn on sourdough toast topped with crumbled persian fetta, asparagus spears and a poached egg. That crazy looking thing on the left is a hash brown - my goodness they make the best hash browns!

Since I took these photos the weather has been unseasonably warm (again) and I haven't worn the coat since.  I've almost finished the black one so fingers crossed we get a coolish day where I can wear it, even if its only to take photos, cause since I interlined it, that thing is like a doona!

Who else likes going out for breakfast?

Beccie
xxx

Tuesday, July 16, 2013

COATS : The Black Cape Collar Coat

After putting the finishing touches on the lilac coat on the weekend (outfit post to come), I made a start at finishing the black one.

After a comment from Esz a little while ago, I started thinking about interlining.  The black wool is an incredible fabric, but much lighter in weight than the lilac and the red coats, and to be honest I was worried I would make this magnificent coat and then be cold wearing it.  So the search commenced for an interlining fabric.  What I came up with was this:

This is what's left AFTER I cut my pieces

Its 100% cotton wadding thats used in quilting.  Its unbleached and chemical free so I thought it was a pretty good option - AND its not too thick.  The other bonus is its VERY wide, so I didn't need to buy 5 metres to make the coat, I needed about 1.5 metres.

So on Sunday I set about making the interlining, and discovered the downside to working with 100% cotton wadding.  Its a fluff machine.


My velour tracksuit pants (yes, I do wear tracky pants at home) are actually black, but by the time I had the interlining together they were covered in so much fluff that they looked grey.  Needless to say it also got all over the black wool of the coat.  I now need to invest in a good lint roller!

Anyway, so I got the interlining made and 'inserted', and by then it was night time, so I moved downstairs so I could continue in better light (the light in my sewing room is really bad at night).  I basted the interlining in around the neck, down the fronts, and around the cuffs.


Last night I sewed the bias to the hem, pressed the hem up, and inserted the lining fabric.  Then I sat in front of the TV (after cooking dinner and cleaning up) and hand sewed the hem for two and a half hours!!!  So all that needs to be done now is sew the lining to the cuffs, secure the facing to the back of the bound buttonholes, sew on the buttons AND baste on the cape (I made it removable just in case I get sick of it).  Obviously thats still a lot of work, and while I hope I'll get it all done tonight, chances are I won't...

But!  Here it is at the moment, covered it white fluff:


The cuffs are folded back to reveal the lining fabric as a reminder that I need to sew them, and the cape is just sitting on the shoulders which is why it doesn't look even.  And the facing is pinned around the buttonholes hence the silver lines.  I really should have taken a better photo this morning - sorry about that!

But it will make the final reveal so much better!

This has been a massive project and I'm so close to finishing I can taste it!

Beccie
xxx

Friday, July 12, 2013

COATS : The Lilac Shawl Collar Coat

So you know I'm sewing two coats at the same time, right? A black one with a cape collar, and a lilac one with a shawl collar.  I'm calling it efficient insanity, cause really, who apart from me is silly enough to sew two COATS at the same time!!! 

After I sorted out the pocket issue, I kept sewing until I got to the point where the construction of each coat was different.  Then I decided to focus on one coat at a time.  Anyone who knows me well would know that the obvious choice was the lilac one!  So on my next weekday sewing day I went at it.

First job was to sew the collar on.  I was pretty excited about this bit because it was really going to be my first indication of the shape of the collar.

I got so excited at this point that I posted this photo to my Facebook page!!!

And this just made me want to get the coat finished, so I got on with the sleeves.

Now, the pattern instructions have you put in the sleeve piece, then put on the cuffs.  I think thats silly, because when your are doing the fiddly job of the cuff, you have to deal with all the fabric the coat is made from.  Instead, what I do is put the sleeves together THEN attach the sleeve to the coat body.

With this coat however, due to the large collar and the pocket detail, I decided that heavy cuffs would be too much, so I just finished the cuffs with a facing to allow my to neatly attach the lining.


Once that bit was sewn together, I sewed both sleeves into the coat.  Set in sleeves used to scare the pants off me, but not any more!  Especially in fabric like this - the wool compresses so much easier when you gather it and its near impossible to get it wrong!


I even matched the underarm sleeves (not that anyone will see them!)

Then I attached the facing, which forms the top of the collar and the back side of the buttonholes.  Pinning it on is always an interesting job.  I prefer to do it whilst its on my headless helper but you don't have to.

I always make sure to match the buttonhole windows with the buttonholes before I pin the seam, just to make sure that they end up in the right place.

Then came time to work out the hem length.  I always get a bit worried at this point because if you get this bit wrong you can make the coat too short.....  So I went into my wardrobe and got out the longest (not by much) of my lilac dresses to put on my headless helper.  You can see it in the photo above.  This helped me make the decision to take 4 inches off the length of the coat.  I marked it up, took a deep breath, and cut.

Then I turned it all the right way out and did some pressing, and put it back on my headless helper.


After I took these photos I started work on the hem.  I was going to be turning it up 1.5 inches, and I didn't want a raw edge, and I didn't want to fold the wool over due to the thickness, so I had a look at a couple of my vintage coats to see what they did.

And this is my interpretation of what they did:


I sewed a piece of bias tape to the edge of the wool and then turned the hem.  You will see that it doesn't sit totally flat - this is because the folded bit is actually longer than where I've folded it too.  Luckily with wool, it shrinks up with steam, so pressing it with a good shot of steam sorted out this minor issue (it wasn't much of an issue because its a fairly narrow hem).  I'm now using catch stitch between the top of the bias tape and the wool to secure the hem.  This takes time, but I'm working on it!

So thats where the lilac coat is at.  To finish it, I have to :
  • Finish the hem
  • Sew in some shoulder pads
  • Sew in the lining
  • Sew on the buttons
  • and, no doubt, some miscellaneous hand sewing.
And since I've got two days to sew this weekend, I'm aiming to get BOTH COATS FINISHED!!!!

This means a photoshoot post next week - yay!!!

Wish me luck!

Beccie
xxx

Wednesday, July 10, 2013

COATS : Pockets Pockets POCKETS!!!

I spent most of last week obsessing about pockets.  How, where, is it necessary etc etc etc.  It took up so much of my brain space that I was making sketches on post-it notes at my day job on how I could do it!  It was something that needed to be thought through properly though, because there were a couple of problems that needed solving...

FIRST PROBLEM : They need to be within a piece of the fabric, not in a seam, so the first thing was how on earth was I to achieve that???

Now, I don't have many sewing books, but I do have this one:


I bought it for not very much on Amazon because it covered detailed things like pockets and collars and buttonholes etc, and this is the first time I've used it.  And thats when I realised that a bound buttonhole is basically the same as a welt pocket - but welt pockets are just bigger.  Derr!!

So I did some experimenting:


But I realised if I wanted to attach a flap to the welt, I would need to do a single welt pocket, not a double welt pocket.  And these are actually faster and easier to do!  Hooray!!!

FIRST PROBLEM SOLVED!

SECOND PROBLEM : Where do I put them???

Pockets have two purposes in my mind - 1. a place to put your hands and things; and 2. provide visual interest.  These two things don't always work together.  Think about it - the most comfortable place to put your hands is in pockets that are down low, but to have an external detail on a coat down low would look completely out of place.  So I struggled to find a compromise.

To help me, I put my red coat on the dress form (again) and cut out two pocket flap shapes from leftovers of the red wool that I still have (I have trouble parting with scraps of expensive fabric!) and pinned them to the coat.  I came up with two locations I liked.


And then I put the coat on and stood in front of a mirror to see how it would look with my hands in the pockets (and even if I could get my hands in them).  I made a couple of small adjustments and decided I had found a compromise.

The more vertical location I thought would work well for the cape collar coat (the black one) and the more horizontal location I thought would work well for the shawl collar coat (the lilac one) especially since the inspiration coat for the lilac coat had pockets pretty much in the same location.

SECOND PROBLEM SOLVED!!!

That decision made all I needed to do was come up with the confidence to hack at the fabric!  I started with the lilac pockets first, because I have more of that fabric and if it was a total disaster I could re-make the pieces.... but I needn't have worried - they came out just fine!


On the left is the inside showing the pocket bag which I made out of wool for warmth, and the right is the welt on the outside of the coat.  I have basted it closed so the piece doesn't distort during the rest of the coats construction.  I also basted the pocket bag to the side seam to secure it inside the coat.  This basting will stay in place.

So I went on to the black one, which also came out just fine!


Then I had to make the flaps to sew to the welts.  This was pretty straight forward.  I made the outside from wool, and the inside (which sits against the coat) from the lining fabric.


Then I sat down in front of the TV and hand sewed them to the coat.


Then I could get on with the construction of the coats!  I stitched the fronts and the backs together of both coats and the linings too.  Here is a sneak peak for you:

 
Things are really coming along well with the coats now, and I'm so excited!  I'm at that wonderful point when I've worked really hard and long on this project and I'm beginning to see it all come together!!!

Beccie
xxx

Friday, July 5, 2013

COATS : Preparation is the key

It may be the key, but geez it takes time!

It has taken me two weekends of solid effort to get to this point, and people who follow my Facebook page will have seen the occasional photograph and post... so if you'd like to keep a closer eye on what I'm up to, go over and click Like.

Since I already know this pattern really well, and I've already drafted the new pieces, the first bit of preparation to do is cutting out the fabric.  And when you think about it - thats a lot of fabric!  Each coat takes 4 yards (or metres, much of a muchness) of wool outer fabric, the same of lining, and a couple of yards of inter-lining.  Thats a lot.

I wasn't drunk, just had to tilt the camera to get it all in...

Here is me laying out the pattern pieces on the black wool.  I got all OCD about making sure all the pieces fitted before I cut anything out.  The last thing you want when you are dealing with expensive fabrics is to just cut it out and then find that there is one piece you can't fit!  I wasn't so worried about the other fabrics because I had 5 yards of each of them, and just 4 of this one, and with the pattern adjustments I was a bit iffy about whether it would fit...

But it was all good, so I got cutting.  The only other adjustment I made (which was the same with the red coat) was to make the skirt pieces 1.5" wider on each side to give more fullness to the coat.


Pin ... measure ... draw chalkline ... cut ... label ... put to one side ... repeat.  For about 8 HOURS!!!!!

No kidding.  I cut fabric for 8 hours.  This is the result.


Doesn't look like much does it!

Next job - one of my favourites (not) - sewing the darts.  Thank fully there is only 12 darts per coat (6 outer, 6 lining) so it didn't take me that long to do it HOWEVER I did use a new technique that I picked up from Peter at Male Pattern Boldness to start and finish the darts.  I've never been happy using reverse stitch to stop things unravelling, and I'm not a fan of the stop stitch that my machine does for general use, so I'd always been in a bit of a limbo about what to do.  Peter posted that he sets the stitch length on his machine to really tiny for a few stitches, and then regular stitch length for the middle bit, then tiny again for the end.  And this doesn't unravel!  Hurrah!!!  So I did that, and it works really well, and I'm going to keep doing it.

Then it was on to the bound buttonholes.  I use Laura-Mae's tutorial - she's the fabulous blogger from Lilacs and Lace - and I do the extra credit method.  This is the same method that I used for the red coat, it really works for me.


I also put 'windows' in the facing pieces so that when I sew the coat together I don't cover up the buttonholes.

I was happy that I'd done all the prep work at this point, so I started sewing the main coat pieces together.  There was a bit of a process to this.

I carried all the pieces I required in to my sewing room from the bannister, and put them in piles on the ironing board.


Then I would sew the bits that needed one thread colour, and then the bits that needed the other thread colour.  Then to press the seams, because each fabric requires a different iron temperature (sigh!) I would turn the iron down to the lowest setting needed and work my way up to the highest setting.  This took a while but was actually really rewarding because I could see that I was getting somewhere!

But then I remembered... POCKETS!

The red coat does not have pockets, because the original pattern does not have pockets, and I find that I just need somewhere warm to put my hands some times.  So I wanted to put pockets in these coats to solve that problem.  The side seams won't work because the positioning is uncomfortable, and the seams between the fronts and the side fronts is too far forward, so the only option is to put the pockets in the side front piece.

I'm going to do some testing of methods on some scrappy pieces of fabric that I've got left over.  I want to make sure I get it right BEFORE I hack into the pieces I've already stitched together!!!

Wish me luck!

Beccie
xxx


Wednesday, July 3, 2013

COATS : Adjusting my favourite pattern

This was actually a lot easier than I expected it to be!  And I'd say thats down to two things:
  1. I'm pretty familiar with the pattern; and
  2. I had the one I made last year on my headless helper and I could pin things to it to check fit.
I thought I would tackle the shawl collar adjustment first.  For a refresher, this is what I wanted my coat pattern to look like:


The collar on the pattern is not dissimilar, its just much smaller, what I needed to do was enlarge it.  So I got out my tape measure and measured what to add.


I then adjusted the pattern piece.  On this pattern the bit of the collar that you see is actually the inside facing.


Once I'd done that I cut it out from that vintage bedsheet I've been using recently, and pinned it on to check how I went.  This is the front:

And this is the back


You can see how the pen line on the sheet piece is pulling away from the centre line of the coat... so I added a wedge shaped piece to stop this from happening.  I made a new collar piece


And adjusted the front piece


I got the shapes for these new pattern pieces from cutting the facing piece into two where the seam line for the original collar is on the coat.  You can see why having the three dimensional coat was so handy at this point!

And that was that one done!  On to the cape collar!


When I looked at the original coat, with the collar flipped up, it would do up to the neck, so there was no redrafting needed of the front pieces, just the facing, a new collar, and new cape pieces.

The facing ended up like this so that I have something to attach the lining to at the back of the neck (I didn't want to attach the lining to the collar).


Then I played around with a piece of the sheet to make a collar that I liked the look of.


Then I played around with shapes for the cape, and this is what I came up with:


And with it all pinned together I put the coat on to make sure I could still move my arms... and I could!  I turned these two pieces of fabric into pattern pieces and I was in business.

This was actually a really fun thing to do on a Sunday afternoon with a cup of tea.  However, I think all the cutting out won't be quite as enjoyable!  I will need to find 'the zone'.  Wish me luck!!

Beccie
xxx

Friday, June 28, 2013

Koumpounophobia

Special prize for you if you know what the above phobia is!
(disclaimer - there is no prize, sorry! But you have my respect!!)

When it came to the buttons for my coats, there was only one place to go - All Buttons Great and Small in Newtown, an inner suburb of Sydney.  Normally this would be a two and a half hour drive just to buy buttons, but thankfully I was already going to Sydney for a sexy photoshoot:

Phwoar!!!!!
Photo by Jessica Eisner 

And to catch up with a girlfriend of mine, Miss Sasha.  Miss Sasha was happy to go to the button shop with me as long as I was happy to go to Spotlight with her (I can't believe she thought she had to ask!).

So, once the shoot was done, I picked up Miss Sasha from the Sherbet Birdie studio and headed off to the button store - or as I like to call it, Button Heaven.

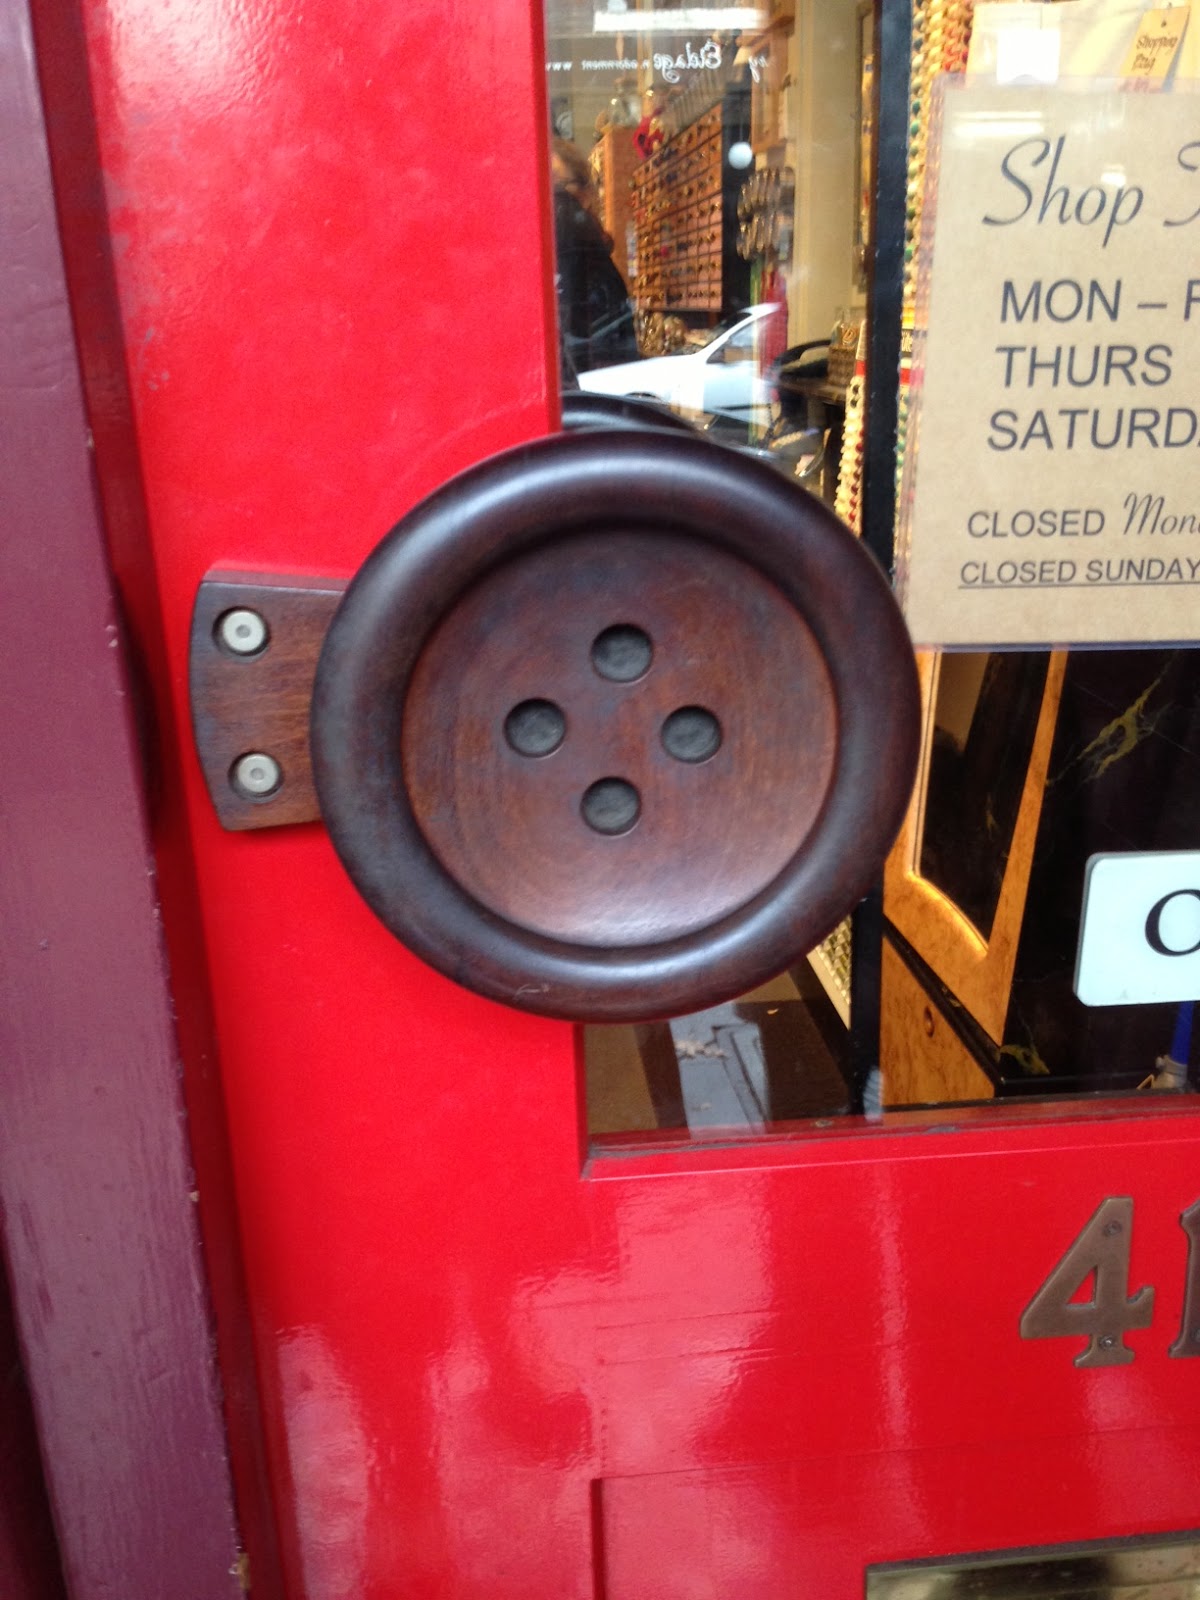
Even their door handle is a giant button!


Here is the inside of the store.  Its not a big store, but it doesn't have to be.  On the right is the counter, and behind the counter are the more expensive buttons, and buckles and things... and in the counter are the most expensive buttons.  I never look in there!

I chose my buttons and while Sasha and I were at the counter chatting to the owner while she served me, a young couple walked in.  And by young I mean late-teens, 20 at most.  Anyway, she had a blindfold on, and he lead her into the store and positioned her in front of one of the bays of buttons.  Sasha and I were thinking 'Aww, she must love buttons like we do!  What a nice thing to do for her!!'

Now, this is where the title of this post comes in.  Koumpounophobia is a fear of buttons.

He whipped off her blindfold and she started screaming and turned to run, and he wouldnt let her leave.  She was hysterical and hyperventilating by the time she managed to get past him and get out the door.  We were all a bit stunned... I commented to the store in general that she best dump that guy quick smart.

But back to the buttons!  I bought these!!

These buttons are for the black coat.  I know they look grey in this photo, but they are textured black.

 These buttons are for the lilac coat.  As mentioned previously, this fabric is IMPOSSIBLE to photograph and get the colour right.  The same goes for the buttons.  They coordinate beautifully, trust me!
 
These 'french blue' buttons have a semi matte finish so they look silver, but they aren't.  They are for a future project.  I was trying to buy all the buttons I thought I would need so I didn't have to go back.

And this beauty is also for a future project, but how gorgeous!

Once I'd paid (don't ask how much!) the store owner was telling me that koumpounophobia is quite common and she has people telling her all the time about someone they know that has a fear of buttons.  I've never met anyone!  She also told me about this video, so I thought I'd share it:

If you want to watch this direct on Youtube, click here

So I'm curious, do any of you know someone with a fear of buttons???

Beccie
xxx