Thursday, February 12, 2015

Capelet Sewalong : Part 1 : Creating a Muslin

Hooray everyone!  Welcome to the Decades of Style 1930s Capelet Pattern Sew-along!!!  I'm hoping everyone has their pattern, fabric, and something to make a muslin with.  But if you don't its not too late - there is plenty of time to catch up.  You can find the pattern here.


For those of us that are ready, lets get started.

First choice is which of the 9 sizes to cut.  On the pattern tissue you will notice there is a table that shows the finished garment's measurements.  It looks like this:


After reviewing the table, I decided to make the 38" bust size.  Then, I went around each piece with a texta marking the line I needed to cut out.  I can't remember where I read this hint, but by goodness it works!!!

Oh yeah, thats right - its on the pattern!!!


Now we are going to make a muslin of the jacket portion of the pattern so we can check and adjust the fit if need be.  I normally don't worry about this step because I don't have a lot of the fit issues that other people have.  If I account for my boobs and my butt when I cut out the fabric, I know I can adjust to fit my waist by taking it in.  But notice how this pattern doesn't have any darts in the front bodice piece?  This means there will be a loose fit with a clean minimal look, but thats not going to suit everyone - especially people like me with bigger boobs.

I am also going to be doing adjustments to the cape pieces to come closer to the look of the garment that I am trying to emulate.  Just to refresh your memory:


But we'll look at what we can do with the bodice first.

Cut out the Bodice Front and Bodice Back pieces from your muslin fabric.  Mark the darts and the fold lines on both pieces, and the button holes on the front piece.

Speaking of buttons, I'm going to add a few more, because by the time I make the front more fitted, it will need more buttons to keep it closed.  Draw two parallel lines on the pattern piece running from one buttonhole to the other button hole.  I'm going to add three more button holes, so using a ruler, I divided the space in half, and then each half in half.  Because the button holes are on an angle, you then need to make marks up the other parallel line at the same increments.

Goodness I hope that makes sense!  Here's a photo!


By the way, just in case you're wondering, I am going to cover making these as bound buttonholes.

Oh, and don't forget (like I almost did) to fold the pattern piece on the fold line and transfer the button holes you just drew to the attached facing.


Now to do some sewing - first job is always the darts (sigh!).  Sew them up using a longer stitch length so they are easy to unpick, and press them.  And while you are pressing things, press the fold line on the bodice fronts.

Pin the fronts and the backs together at the side seams and the shoulder seams, leaving the pointed bits free.  They form part of the collar.  Sew the seams together using that longer stitch length once more.  NOTE THAT THE SEAM ALLOWANCE IS 1/2"!


Press the seams open, and you are ready to assess the fit.  I'm going to use my headless helper, but if you don't have one just put it on yourself.  You might need someone to help you though.

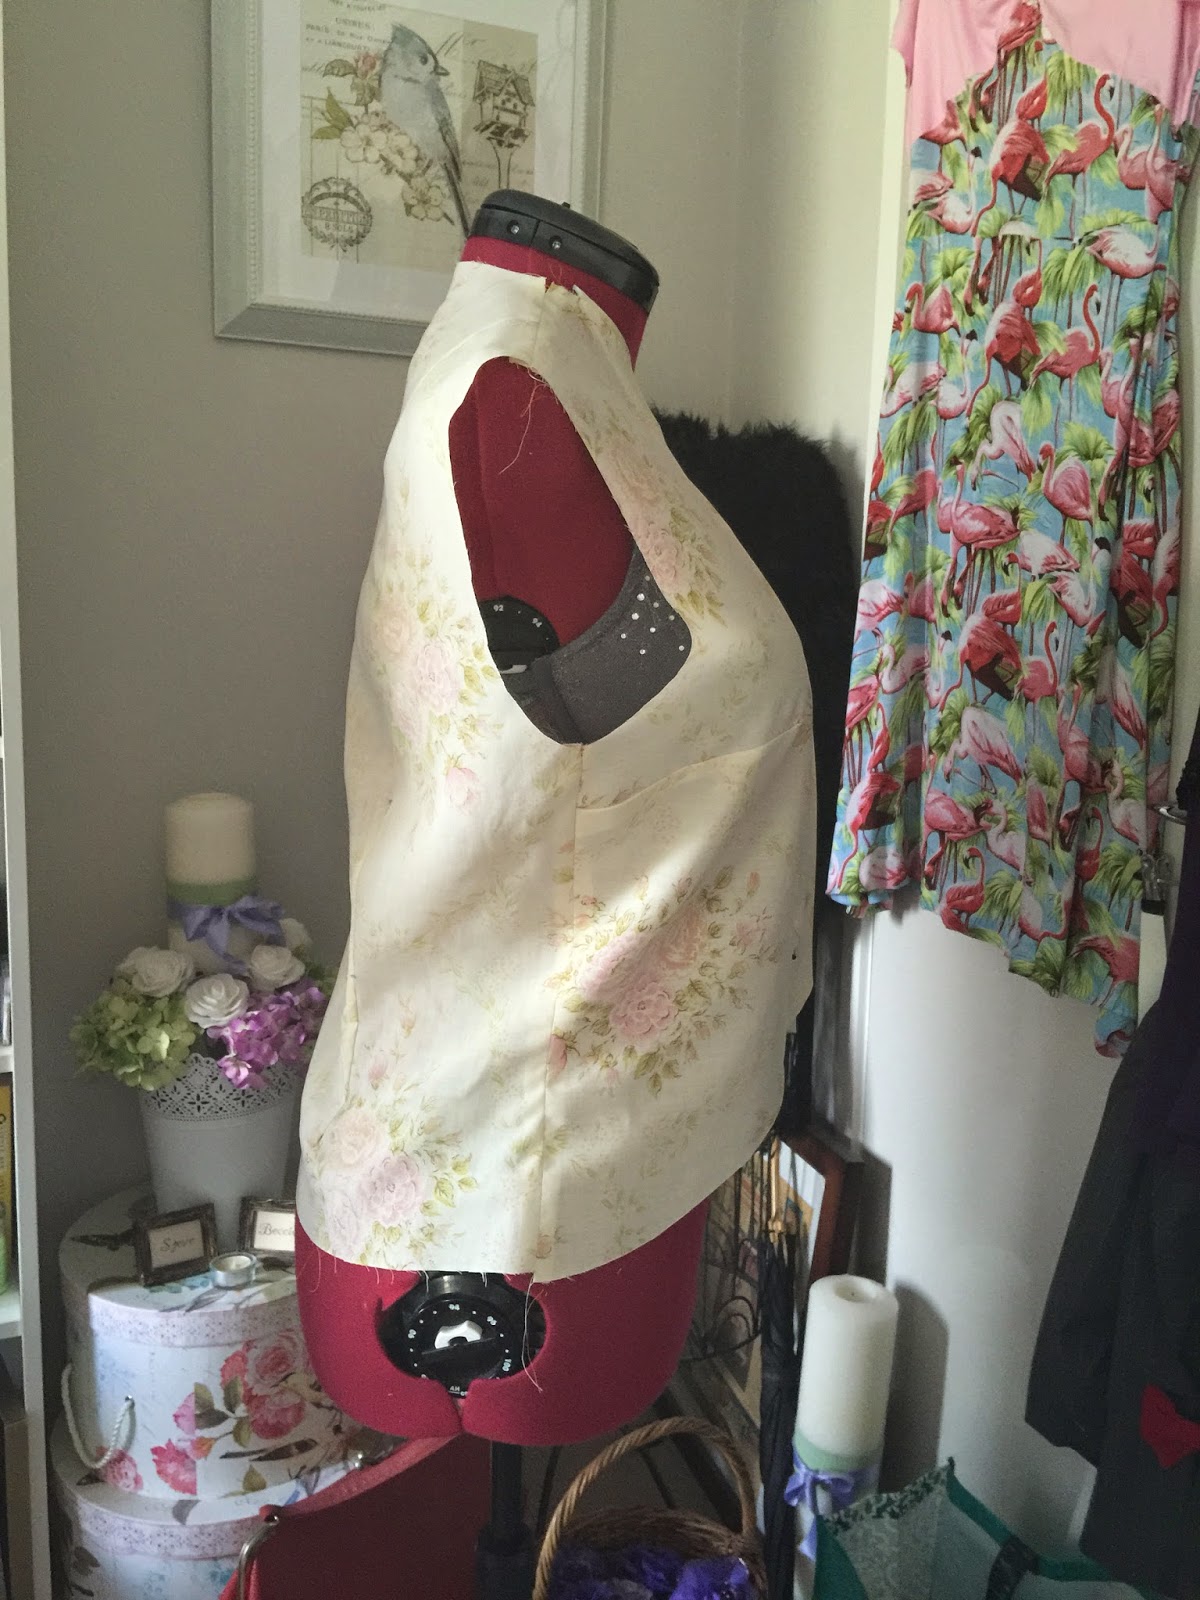
Pin it together so the buttonholes form Xs.  Mine looks like this.


You can see that it hangs straight down from the point of the bust.  I don't like that, my waist disappears and I look bigger than I am.  So to fix this, I've decided to make darts.  Other options are to take the side seams in a little, or add a cinch belt at the back.  Experiment and see what works best for you.


I find it almost impossible to do the same thing on each side, so I just pin one side, draw texta marks to make the shape, then trace the shape onto the other front piece.  Then sew both (with a longer stitch length) to make sure it works properly.


If you aren't going to make adjustments to the cape back, you can unpick it all now and mark your changes on your pattern.  But if you are, read on!

The back of my inspiration capelet is almost a complete half circle, so I need to extend the cape pieces.  Starting with the back piece, I've drawn a line out from the shoulder.  Then I also need to redraw the cape hem.  This is complicated, cause its kinda maths-y.  I need to work out a radius for the circle.  I measured the length from where the new line comes off the shoulder, to the edge of the pattern piece.  It measured 13"


Then continue to measure in a straight line along the shoulder to where it meets the collar corner.  The whole length measures 22.5".


So that means 22.5" is our radius.  Using your tape measure, mark a curve with the 22.5" radius.


I have decided to lop the bottom of the circle off to make it not as long, so I drew that freehand.


Now for the front cape piece.  It really is as simple as matching up the notch at the neck, and tracing the shape of the piece added to the back, to the piece added on the front!


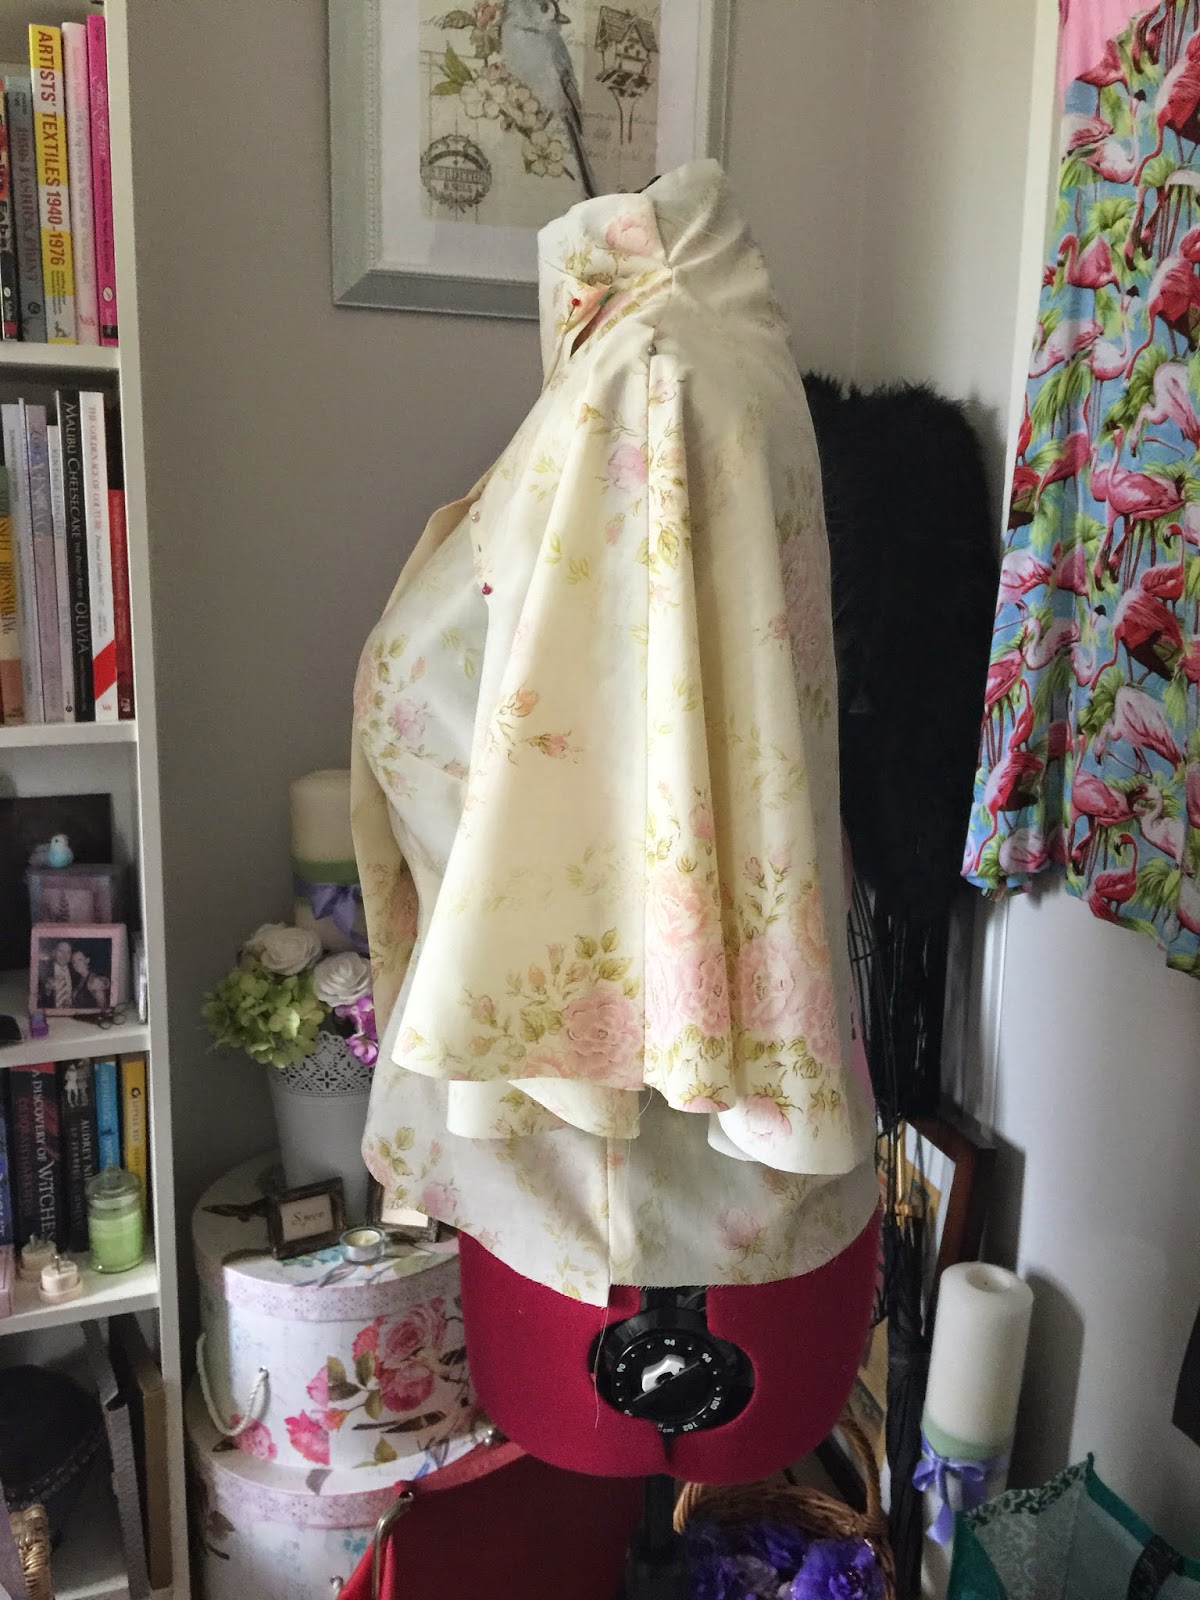
Ok, now we get the muslin fabric out again and cut out the two pieces we just made.  I sewed mine together along the shoulder seam and pinned them onto the bodice.  I mean, I could have sewed them on but I was feeling lazy.  This works just as well!


I'm pretty happy with it, but I don't really like how the 'sleeve' sits higher at the point of the shoulder seam.  Its between and 2 and 3 inches.  So I'm going to add a bit of extra length and redraw the curve on the front and back pieces.

Beccie
xxx

PS.  As well as covering how to do bound button holes in the sew-along, I will also be lining my capelet, and sewing in some hair canvas. Neither of these things is covered in the original pattern instructions, so if you want to join in, grab some lining fabric and some hair canvas.

PPS.  Note that not all fabrics are going to need hair canvas.  If your fabric is cotton or lighter, just use iron on interfacing.  If your fabric is gaberdine or heavier you can choose to use hair canvas. 


Tuesday, February 10, 2015

The SEWsterhood of the Travelling Pattern : My Dress


There has been an amazing response to this idea of a travelling pattern - I think the list is in the mid 70s now!  I've made my version, so soon the journey will begin.

But first - I better fill you in on my dress.

I have made this pattern (and blogged about it) once before.  You can read the final post for that dress here  but even then I didn't make it as per the instructions.  That time I made it a false button front.  This time I decided to have it button all the way from top to bottom, with the buttons exposed - so different to both versions of the pattern.

Here is the fabric I chose:


A fabulous vintage cotton with asian inspired  pictures and lanterns.  The colour struck me as perfect for a warm summers day - blue can be so cooling!

The other thing I wanted to add was some decorative piping.  I picked the (surprise surprise) violet colour from the fabric and made up my own piping.  Its so easy, and such a great way to decorate your clothes.


I added piping along the edges of the shoulder/sleeve piece first, and put the bodice together.  (By the way, I made new bodice front and back pieces with a 40" bust which will travel with the pattern).


I REALLY LOVE the way that the bias looks on this bodice!  It really highlights the design element of the shoulder/sleeve piece!

After adding the facing to the bodice, I moved on to putting the skirt together - and don't you love it when this happens without any planning!?!


By some amazing coincidence my skirt fronts lined up perfectly!!!  Same can't be said for the skirt sides or back, but I almost didn't have enough fabric to make the dress at all, so I wasn't going to worry about matching the pattern at the seams.  Got to love a happy coincidence though!

Anyway, I added more piping to the waist and sewed the skirt to the bodice.


All that was left was to do the machine button holes and sew on the buttons.  I used the spacing of the button markings on the bodice pattern pieces to mark where to put the button holes on the skirt.  And instead of putting a button on the waist, I put a trouser hook and eye.

And then for extra credit, I made a matching head scarf!  Cause why not!!


So there you go!  That is my version of the Travelling Pattern!  So I bet you all want to know who's up next... that person is:

Naomi Chambers
Fort Smith, Arkansas, USA

Naomi, I will be in contact shortly.  Remember that the Sewsterhood needs you to down tools on your other projects and make this one up as soon as you can.  Take lots of photos, write me a story for a blog post, and add your hints, tips, and whatever else you'd like to the notebook.  Only when you've finished are you to send the pattern on.

The journey begins!

Beccie
xxx

Tuesday, February 3, 2015

The Sherbet Birdie Candifornia Pool Party!

A couple of months ago Sasha from Sherbet Birdie announced that she was going to have a pool party!  An excuse for all the pinups to get together in a fun, social, supporting environment.... WITH INFLATABLES!!!


Of course I had to go!  And so did a friend of mine - MsKatt, who decided to fly up from Tasmania.

First things first - what to wear?  I had recently impulse-purchased a new Esther Williams swimsuit with a kitschy-cute lobster print on it... hmmmm... LOBSTERS!!!  ALL THE LOBSTERS!!!

So I started hunting around to find suitable fabrics, trims, and bits to make my outfit insanely awesome!  I found chiffon and ric-rac and fringe to make a fabulous cover-up, a cheap necklace and some resin lobsters to make an amazing necklace, and a hat form and a large rubber lobster to create a crowning glory or a headpiece.

And then of course I left it all to the last minute....apart from the necklace, which was a good thing.

When the lobsters arrived they were red.  I tried to paint them orange with nail polish, but it bubbled.  I tried to take the nail polish off with remover... and this happened.


Well, I had to soak them in nail polish remover, and scrub them with a nail brush to get them to this point, but you get the idea.  So after about a hundred coats of nail polish they looked more like this.


I had purchased a necklace with tassels from good old Target - a bit of a lucky find, because it was just the right colour!


I removed a few tassels and added the lobsters and then didn't do anything, and all of a sudden it was the day before the event, I was tired and *cough* hungover *cough* and hadn't finished my cover-up or my hat!

Luckily, MsKatt had arrived early, and she's a wizard with a glue-gun, so I set her to work with all my hat bits while I sewed the cover-up.

The plan was to copy one I had purchased from Target (again - I swear its the only modern shop I buy things in!), but when I laid it out on the fabric I noticed there was set in sleeves...


...which, frankly, scared me.  Set in sleeves in chiffon isn't something I would take on when I was with it, let alone when I was a bit under the weather.  So I decided kimono sleeves were the way to go!

I flattened the sleeves at the underarm and created a fold  near the shoulder, and cut from the point of the shoulder down to the cuff.


Then I cut the fronts, and sewed them together.  It went quite well!  I had to sew carefully because chiffon really is a shifty little bugger!

Then came the trims.  The only orange fringe I was able to find was on eBay, and there was only 1.9 metres of it which turned out not to be enough.  I sewed it on the bottom of the cover up...


... and then sewed ric-rac to the arm cuffs.  Not really what I wanted, but I didn't have much choice at this point!


I then sewed a rolled-ish hem up the fronts, and the neckline and it was DONE!

MsKatt (we decided her pinup name should be Miss Gina Gluegun) was still sitting on the floor gluing like a demon.


My cheap glue gun makes ribbit sounds like a frog (which caused much hilarity) but still manages to do a good job when wielded by a master glue-gunner!


Thankfully that was my outfit sorted!  The following day was the pool party!

Can I say that arriving at a public pool dressed like this does take courage.


Especially considering we had to walk through a large public park to get to the public pool!  But once inside we were surrounded by women who appreciated my over the top outfit, and we set about enjoying ourselves!


We may or may not have smuggled in alcohol to drink out of our plastic coconuts...


I got to spend some long awaited quality time with Miss Lucy Topp (Sherbet Birdie's most magnificent makeup artist).  She is one of my soul sisters, I love her.


Then I headed for the pool.  It was a pool party after all!


I don't think there was a single woman there that got her face wet!  Or her hair!!  hahaha!!!

Its MsKatt over a sea of inflatable donuts and cupcakes!


We had our own lifeguard, but I must say that the rest of them seemed to come to our corner of the pool quite a bit.  I wonder why!?!


These are the two ladies who are responsible for this wonderful day - Miss Sasha (right) and Sorelle.  Such an amazing concept ladies.  Such a wonderful way to bring like minded women together in an environment that creates and rekindles friendships without the need for competition.  Viva la revolution!

I can't wait for the next one!

Beccie
xxx

Wednesday, January 14, 2015

A Pretty Dress for a Day at the Cricket

Every year my husband attends the 5 day cricket test match at the Sydney Cricket Ground.  Day three of the test is Ladies Day, also called the Pink Day, because the idea is that everyone wears pink and donates to the McGrath Foundation - a breast cancer charity.

I like to make an outfit every year for this special day.  Last year I made one, and had my own tea party because I wasn't well enough to attend the day (you can read about it here).  This year I wasn't really sure if I'd be going, but I thought I'd make a dress anyway.

I had recently purchased some amazing vintage rayon fabric, and some of it was pink with the best novelty print of ladies wearing fabulous hats.


I had also recently received some reproduction patterns from Eva Dress (if you haven't looked at their website, you should!).  This dress pattern seemed like just the thing to wear on a hot summer's day.


My fabric, being vintage, was narrow, and by the yardage chart on the pattern, I didn't have enough, but only just.  Sigh!  I started out by laying my fabric out on the floor and seeing if I could make the pattern pieces fit.


Its like a giant jigsaw puzzle!  It took me quite a few goes to find something that worked.  I even tried the layouts included with the pattern - and I never do that!  I eventually found the winning combination, and it meant having a seam in the sleeve.  And I couldn't match the pattern either, so I just hoped that the fullness would hide it all.


Construction of this dress is so amazingly straight-forward!  Almost too simple - and I started to worry that without darts at the waist, it would look like a potato sack.


But the response on my facebook page was to trust the pattern and keep going.  Apparently a lot of 40s dresses look like sacks on hangers but look magical on.  I own lots - how had I never noticed!!!  And worst comes to worst I could add darts in when it was all finished anyway...

The last big decision was the bow.

To bow or not to bow.  That was the question.

The dress sat on my headless helper for a good week and a half while I tried to make a decision.  Eventually I realised that it was part of the pattern for a reason, so I should make it and pin it on and then see what I thought.


The decision was a resounding YES!  Without it the dress seemed unfinished, but with it, it sang.

So I finished off the hand sewing and wore it to the cricket!


Steve is a member of the SCG IX, which is a special club within a club for members that play cricket for the SCG.  Each year we have a special area - and this year it was a fabulous white summerhouse with a view of a big screen and right by a bar.  The only thing it was missing was a jacuzzi!!!  It was a lovely place to sit, and I felt lovely and glamorous all day!

Yes, I did actually watch some cricket...  I didn't just socialise.

Its lovely to see so many people get involved for this cause too - I didn't see one person NOT wearing pink, and so many people go to a great deal of effort with their outfits.  I met the son of a friend who was really my kind of person - I mean, just look at his hat!


I had a great day, and this dress ticked all the boxes - pretty and elegant, easy to sew, and comfortable to wear.  I can see at least two more of these in my future!

How about you?  Tempted to sew yourself one?

Beccie
xxx

Thursday, January 1, 2015

Announcing Another Sew-Along!!!

When my last sew-along finished, there was much talk in the Swirl Facebook group about holding another one.  It didn't take much to convince me - I had had as much fun as everyone else I think!  (By the way, if you want to have a look at the round-up post you can find it here).  Rather than doing it all on my own, this time I decided to team up with Decades of Style, an online vintage reproduction company specialising in patterns from the 1920s through to the 1950s.


I don't know if you've looked at their website, but I remember the first time I did I wanted to buy just about every pattern.  Let me tell you, narrowing it down to just one pattern for this sew-along was nigh on impossible!

After much debating with myself, I chose this gorgeous 1930s capelet pattern:

Look at it!  It doesn't get much more elegant than that!

The good thing with this pattern, is that it will work for both sides of the globe.  For those of you who are currently in winter, you can make it in wool suiting or even wool coating!  For those who are currently in summer, you can make it in a lighter fabric like cotton or silk for a summer evening cover up.

Here is a vintage example I have dreamed of recreating since I first saw it.  This one was sold by FabGabs on Etsy:


So this is what I'm aiming to do with mine.  And yes, I am going to tell you all the adjustments I make so you can do it too!

And the best thing is that Janet from Decades of Style is giving my lovely participants a 20% discount on the pattern!!!  All you need to do is use the code CAPE20 when you check out.  The code is valid from now until the end of January.

Now, Janet also told me that international postage (she is based in the US) is quite pricey.  For the price of posting one pattern, Janet can post up to 100 patterns.  So I figure you have two options:
  1. Buy a bunch of patterns to try (I did - I ended up buying 4); or
  2. Team up with some other sewers in your country and buy together and share the shipping!
The Facebook group (which is now called Sew Retro Rose's Lovely Ladies) will be talking and sharing about this pattern too (amongst other stuff sewing and non-sewing related - they are a friendly bunch!) so if you would like to join, please comment below with your email address and I will send you an email invitation to join.  This group would be the perfect place to meet other people in your country that you could share shipping with.  If you aren't comfortable with leaving your email in the comment, please send me an email at sewretrorose (at) gmail dot com.

This sew-along won't start until the 1st of February to give everyone time to get the pattern and their fabric.  Please note its important with this one to make a muslin, so make sure you have something lying around that you can follow my first post with (that will be all about making your muslin).

Here is another link to the pattern.

I hope you like my choice of pattern, and that you are going to join me on this sew-along!

Beccie
xxx