Its a beautiful, warm (very warm!) day here today so I thought it would be the perfect day to wear my tropical print dress for the first time!
It turned out so well, I'm really happy with it. The boning gives the bodice shape and the shirring gives it a fabulous fit! And I recently purchased a dress (yes, I buy clothing too - don't even ask about my wardrobe) that had the perfect coloured pink belt! And I'm sure you recognise the necklace too - its the one that the talented Lucy Luxxe made for me for my Melbourne Cup outfit.
Here's the back:
The shirring is in the side back panels, and when I make this again, I'm going to have bigger shirred panels and a smaller 'zipper' panel in the back - which means more shirring hypnotherapy for me!
And finally - here I am with the bag that started it all... sparkly pineapples!!!!
Speaking of which, did you see what I found last week...
Yes, you are seeing correctly - that bag has SPARKLY FLAMINGOS ON IT!!!!!!! So the crazy make-dress-to-match-bag saga will continue! Stay tuned!!!
Beccie
xxx
Showing posts with label tropical dress. Show all posts
Monday, November 26, 2012
Tuesday, November 20, 2012
Shirring - I think it might be addictive!
There is something meditative about shirring - feeding a piece of fabric through the machine over and over to make lines of stitching... I found it quite peaceful!
I hadn't shirred anything before so I read a few tutorials (mainly this one) and went from there. Mine is nowhere near as neat as hers but you get the idea :)
I shirred the whole piece and then cut the size panels I wanted, because I needed two - one for each side of the zip. My idea for construction was based on a vintage swimsuit that I have - two shirred panels are inserted in the back, and the ends are sandwiched between two layers of unshirred fabric.
That doesn't make much sense does it...
I also wanted to put boning in the bodice, and at the back where the zip is going, to give it some shape and support. I thought the best place was to run the bones along the seam lines of the lining, like this:
So I put the bodice all together so all that was left to do was add the skirt and put in the zip. The skirt was pretty easy, just two big panels, joined together and gathered to size. The hard bit was getting the zipper it, it was last of all and manhandling it through the machine was a bit of a pain - however we made it!
I totally ran out of time after this, so I haven't even tried it on yet. Next post will obviously be me swanning around in the dress and the fabulous sparkly pineapple bag that started it all!!
Beccie
xxx
I hadn't shirred anything before so I read a few tutorials (mainly this one) and went from there. Mine is nowhere near as neat as hers but you get the idea :)
I shirred the whole piece and then cut the size panels I wanted, because I needed two - one for each side of the zip. My idea for construction was based on a vintage swimsuit that I have - two shirred panels are inserted in the back, and the ends are sandwiched between two layers of unshirred fabric.
That doesn't make much sense does it...
Does this help???
I also wanted to put boning in the bodice, and at the back where the zip is going, to give it some shape and support. I thought the best place was to run the bones along the seam lines of the lining, like this:
That white stuff is the boning casing
So I put the bodice all together so all that was left to do was add the skirt and put in the zip. The skirt was pretty easy, just two big panels, joined together and gathered to size. The hard bit was getting the zipper it, it was last of all and manhandling it through the machine was a bit of a pain - however we made it!
Ta Da!!!
I totally ran out of time after this, so I haven't even tried it on yet. Next post will obviously be me swanning around in the dress and the fabulous sparkly pineapple bag that started it all!!
Beccie
xxx
Thursday, November 15, 2012
Inspired by a Sparkly Pineapple!
Yes, you read that right - I have been inspired by a sparkly pineapple to create a comfy tropical dress for summer!
Here is the sparkly pineapple:
Now I have absolutely nothing that goes with this bag, but I couldn't help but buy it when I found it online. Its from the 90s, so its not my normal vintage purchase, but who could resist it! I found some fabric that was tropical to go with the pineapple, but in colours that suited the rafia (that is if it is rafia - I have no idea what its made of...)
I liked the dark rosey pink flowers and the pale khaki green, and while its not a colour I would normally wear, it does suit me.
Now for the design of the dress!
I wanted a sweet-heart neckline strapless dress with some decoration on the bust, and a full gathered skirt. But given that I had the picture in my head of what I wanted, finding the exact vintage pattern was like looking for a needle in a haystack. Add to that that I didn't want to pay any more than $15 for it...
This left me with drafting my own pattern - which doesn't scare me, I love chucking myself in at the deep end!
I started with the adjusted blouse pattern that I used to make the bodice for my Melbourne Cup Dress. I chopped it and pinned it and drew lines on it and came up with these pieces:
And because I wanted to be able to use the pattern again without having to remember anything, I then re created the pattern with all the seam allowances and things:
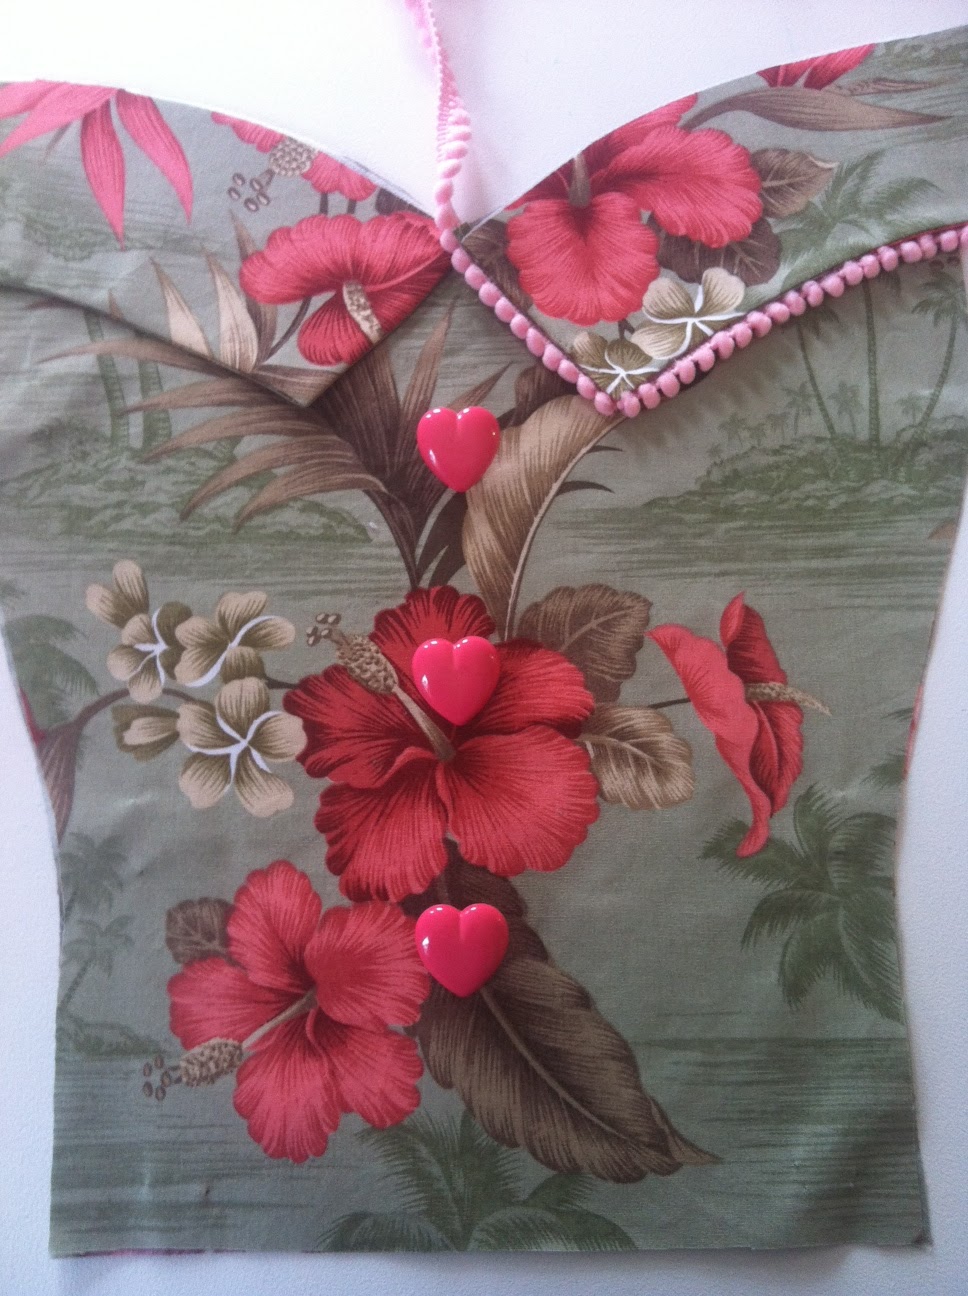
And because I was enjoying pottering around and taking my time, I had a bit of a fiddle with trims, and I came up with this:
I've since found better buttons, but I liked the bobble trim so I've stitched that on. Now thats the front taken care of, but I still haven't incorporated the comfort factor... thats where shirring comes in! But more about that next post!!
Beccie
xxx
Here is the sparkly pineapple:
Its a sequined pineapple with embroidered flowers and leaves on a soft woven handbag!!!
Now I have absolutely nothing that goes with this bag, but I couldn't help but buy it when I found it online. Its from the 90s, so its not my normal vintage purchase, but who could resist it! I found some fabric that was tropical to go with the pineapple, but in colours that suited the rafia (that is if it is rafia - I have no idea what its made of...)
I liked the dark rosey pink flowers and the pale khaki green, and while its not a colour I would normally wear, it does suit me.
Now for the design of the dress!
I wanted a sweet-heart neckline strapless dress with some decoration on the bust, and a full gathered skirt. But given that I had the picture in my head of what I wanted, finding the exact vintage pattern was like looking for a needle in a haystack. Add to that that I didn't want to pay any more than $15 for it...
This left me with drafting my own pattern - which doesn't scare me, I love chucking myself in at the deep end!
I started with the adjusted blouse pattern that I used to make the bodice for my Melbourne Cup Dress. I chopped it and pinned it and drew lines on it and came up with these pieces:
And because I wanted to be able to use the pattern again without having to remember anything, I then re created the pattern with all the seam allowances and things:
Trust me - it sucks when you use something you haven't used for a while and you forget to add the seam allowance and you've already cut it out and you have NO MORE FABRIC!
And because I was enjoying pottering around and taking my time, I had a bit of a fiddle with trims, and I came up with this:
I've since found better buttons, but I liked the bobble trim so I've stitched that on. Now thats the front taken care of, but I still haven't incorporated the comfort factor... thats where shirring comes in! But more about that next post!!
Beccie
xxx
Subscribe to:
Posts (Atom)