Thursday, August 30, 2012

Rose Seidler House 50s Fair 2012

So, all that frantic sewing of the coat and the matching dress was because the Rose Seidler House 50s Fair was coming up and I wanted to wear my new outfit to the fair.  You see, the original coat I made 12 months ago made its debut at the same fair in 2011, and I thought it would be fitting for the red coat to have its first outing at the same place 12 months later.

However, a wonderful spanner was thrown in the works by one Pia Andersen, who I've met recently.  She asked me to model in the vintage fashion parades on the day - and who says no to that kind of opportunity!  Not me thats for sure!

Rose Seidler House was built in 1948-50 by internationally renowned architect Harry Seidler for his parents Rose and Max.  It is located north of Sydney on a large estate of natural bushland.  The house, contents and grounds have been carefully restored to the original 1950 look and are now a museum owned by the Historic Houses Trust.  You can read more about it here.

Rose Seidler House

 A photo of the house from 1951

There were three parades during the day - Sunday Best, Swimwear, and Cocktail and Evening Wear.

Sunday Best - thats me on the left
Entire outfit owned by Pia Anderson (jealous!), photo by Louise Whelan 

Swimwear - my vintage suit, Pia's bangles and glasses
Photo by Brent Wilson 

Evening Wear (thats me on the right) and the whole outfit IS MINE!!!
Photo by Louise Whelan 

Well, all mine apart from the fabulous rings - they are Pia's
Photo by Louise Whelan

As part of the parades we would rove through the crowd for half an hour after each turn on stage.  The six other models and I would split into groups and just walk around, having our photo taken umpteen million times by everyone that wanted to take one.

This all meant that I got very little time to put on my outfit and shop in the vintage market!  I only really wanted fabric or patterns or buttons... or some bakelite bracelets.  But, thank goodness - I did get a little bit of shopping done - and this is what I bought:

I may never refer to this... but you never know!  
And it was only $10... I saw the same thing selling on etsy the other day for $48!!!

These fabulous buttons - I love vintage buttons!

These AHHH-MAZING buttons!

 I love this dress pattern - the shoulder detail is fabulous
The original mail order envelope is gone though, and I can't find a brand name anywhere.  It does look like an Anne Adams or a Marian Martin by the illustration.  Anyone know?

This looks to be a jumpsuit!  And the label is a small Australian pattern house from the 50s.  I bought it because its a bit of an oddity - I will probably never make it up.  I don't think jumpsuits are my thing...

I'm always searching for a nice blouse pattern and this one has enough detail to be interesting, but not too much that its painful to sew.

And this peignoir and robe pattern - so beautiful!

Its amazing what you can find in half an hour!  Rose Seidler House 50's fair is a fabulous vintage day out.  I'm already looking forward to next year.

Beccie
xxx


Monday, August 27, 2012

Do you impose sewing deadlines???

Have any of you sewn under a self imposed deadline?  I seem to do it to myself all the time, and I'm not a good boss!

My most recent deadline was to sew a dress to accompany my new red coat.  And the deadline is due to the event that was on on Sunday.

The Rose Seidler 50s Fair is a wonderful, annual, purely vintage festival in Sydney (more on this later on in the week - its worth the wait!), and funnily enough the original coat that I've been re-visiting was worn for the first time at this event last year.  So of course I wanted to finish my outfit to wear to the same event!

But that meant sewing a whole dress, from start to finish, in one day.

ONE DAY.

And of course I didn't make my job any easier by choosing a pattern that I'd used before, or even one pattern for that matter.  No, I decided to use a modern pattern for the bodice that I then modified, and a vintage pattern for the skirt.

Here is the pattern I decided to use... version C

Version C has a cross over bust detail with pleats in a style that I always like, and cute little cap sleeves.  I decided to modify the pattern so it had a V back instead of the rounded neck back - easy!

But wait - I haven't talked about my fabric yet!

Now, regular readers will know about my love of matchy-matchy, so therefore I adore the idea matching coat linings to dresses like this:

Maximum Matchy-Matchy!

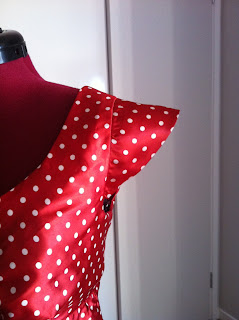
So with the opportunity in front of me, how could I resist making myself a dress out of red polka dot satin!!!

Right, so because my fabric is satin and therefore flimsy, I decided to interline the bodice with a light cotton to give it some... robustness for want of a better word.  The bodice goes together in two separate sections that look like this:

The fronts at the front, the backs at the back

It was a fairly straight-forward sew to this point even though I had an extra thickness of fabric, but this is where it started to go off track.

I put the bodice on my dress form and noticed that the front section fell straight down from the boobs, rather than curving under the boobs.  So I added a dart so there was some shape:

 I'd say the pattern was drafted for people with small boobs...

Then there was the issue with the cap sleeves.  As per the pattern illustration (which lie - as previously established) I expected the sleeve to be angled downwards, but no:

 
Wing sleeves = yuck! 

And due to the fact that the sleeve is inserted with the lining in a single step (its then turned through to create one single piece for each side - really easy construction!) I was not going to unpick the thing and start again... so I decided to fix it like this:

 
See the little tuck with the pin?  I replaced the pin with a couple of stitches

So then it came time to attach the skirt, and due to the fact that I cut it out in a hurry (ie, minimum measuring maximum guessing) and had added darts to the bodice, I was pleasantly surprised to find that it fitted perfectly AND the bodice darts matched a seam on the front of the skirt!!!  Total fluke!!!

 
A very happy coincidence! 

And then I sat up half the night re-hemming the coat (did a crap job the first time), sewing on buttons, and doing some handsewing on the dress.  And I did it, I got there, I made a dress in a day!!!

And here it is - the moment you've all been waiting for - THE UNVEILING OF THE WHOLE OUTFIT!!!

Yep, I went with the lips buttons, even though they got the least number of votes!
And the coat does have large shoulders, and I've put shoulder pads in, but I'm thinking that the ones I've used were too flimsy and it needs heavy duty ones...

I just love the shape of this coat, its really feminine, and I love the bigger collar

Matchy-matchy!


This is so cute I could die!
And how AHHHMAZING is the handbag!!!

I like the V back much better than the rounded neck look

So, what does everyone think?  I love it, and the dress is really comfy and the satin suprisingly doesn't crush easily!  Hooray!!  

Now to decide on my next project... hmmmm.....

Beccie
xxx


Friday, August 24, 2012

The New Butterick Collection - Fall/Winter 2012

Now this is a collection worth getting excited over!  And not only because its on sale with patterns costing US$2.88 for a very short time (I think the sale ends tomorrow).  I may have already taken advantage of the sale and purchased two patterns....

While there are patterns that I don't like:

1980's Party Frock Horror

Pajamafication!!!

There was some GOLD!

Gertie from Gertie's New Blog for Better Sewing is now designing two retro inspired designs a season for Butterick - and these are her first designs:

I love the neckline of this dress!  B5814

This coat has a fabulous colour and a lovely full skirt - shame no petticoats were involved in the photoshoot to show it off...  B5824

I may have bought both of those patterns.... but $2.88 is a steal!!!

There was also this Butterick Retro 1956 pattern, which I originally decided I wasn't a fan of


Until I saw the full skirted version...

 
Divine!

And there was also one other coat that was drool-worthy


I love it!  I love the collar!!  It reminds me of this vintage pattern I haven't been able to bring myself to buy yet because of the exhorbitant cost...


The blue version on the right has a really similar collar...

Go an buy yourself some amazing patterns here before the sale ends!

Oh, and while your at it, Gertie's new book has just been released on Amazon.com.  It looks like being a really good sewing book with tutorials on couture techniques and some patterns as well!

 
check it out here 

I may have purchased it as well......

Have a great weekend everyone!  Happy sewing!!!

Beccie
xxx


Tuesday, August 21, 2012

A Project Revisited - Part 3

Clearly I have run out of the imagination required to come up with a good title.
Sorry.  I will try harder next time!

Well I had a very busy weekend with little time for sewing.  It was my husband's birthday last week so I threw a dinner party in celebration on the Saturday night, which I had to cook for all day.  And on Sunday I spent the day baking cupcakes. 

You see, Monday was the RSPCA Cupcake Day, where volunteers like me bake cupcakes and invite people to eat them, and then donate money to look after the mistreated and abandoned animals that are in the RSPCA's care.  Its a really worthy cause.

Mmmmmm!

We don't have a large office so I aimed to raise $50 and also invited my Mum, Dad and a friend to help me reach my target.  And we did!!!  We raised $84.30 for the puppies and kitties!!!

So, with that achievement in mind, I went home from work with the aim of having a good crack at finishing my coat... or at least getting close.

First step was making the skirt of the coat the right length.  On the weekend, I did find the time to work out the length and mark where to cut the coat and the lining.


I put the coat on my headless helper and pinned around in a line where the waist was.  Then I got out one of my petticoats and measured the length of the skirt.  I then added two inches to give me something to play with hem wise, and then measured from the waist line and pinned the line to cut.  I did the same thing with the lining, but cut it an inch shorter than I cut the coat.

Then I sewed on yet more bias tape to finish the edges of the coat and the lining, then I sewed the two together.

Ta-da!
I'm sorry this photo isn't the best - too much sunshine in my sewing room
I shouldn't complain about that though...

Then I started hand sewing.

Gee there is a lot of hand sewing to do.

I'm not that fond of hand sewing...

I can see that the next few nights will be spent in front of the TV with the coat on my lap and a needle in my hand as I sew up the hem and sew on the buttons.  I've already sewn the back of the bound buttonholes to the buttonhole lips, and I started on the hem.  But there is a lot to go....

 
Its looking nice and neat so far! 

Now, we all know how much I love my matchy-matchy... well apparently it was the done thing in the 1950s to have a dress that matched the lining of your coat... so guess what I'm making next?????


Beccie
xxx


Thursday, August 16, 2012

A Project Revisited - Part 2

Well didnt I have a productive weekend!

After last weeks effort of pre-cutting all the pieces I would need to make my red coat, I managed to spend two whole days putting it together... but its not finished yet!  Oh no, there is still a way to go.

Making a coat like this is a bit of a committment of time and money, and if I'm going to do something I want to do it properly.  This means have the inside looking as pretty as the outside, even if hardly anyone sees it.

With that in mind I decided to run bias tape (because I can't readily buy rayon seam binding - might have to hunt some down and try it...) down all the long edges of the main pieces of the coat.  So it looks like this when the seams are sewn:
Pretty!

And wow didn't that take some time!  And some bias tape - about 16 metres of the stuff (or 17 and a half yards for my American friends).  A lot of effort considering the coat is lined and you will only ever see a couple of inches of it... Still, I'll know its there!

The other extra effort I went to was the button holes.  Ever since I found out what they were, I have always wanted to try bound button holes, but hadn't had a project worthy of the effort of doing them on... until now!  Serendipitously, the amazing blogger Laura Mae from Lilacs and Lace posted this extremely comprehensive tutorial on just how to do them!  You can find it here.

Using this tutorial, I did a test button hole using my fabric:

My first bound buttonhole EVER!

And I was so happy with the result!  So, with that in mind I moved forward on repeating the process on my coat front and facing.

This is the part where you make the little windows - kinda reminds me of a tissue box

Neat little windows

This is the end result, with the bits cut down and the thicknesses all graded

At this point some of you are probably wondering what buttons I chose...

Well the round buttons got two votes, and the lips got two votes, and the hearts got about 6 votes.  But, I really like the lips, even though they are crazy and over the top, so I've done buttonholes that are a teeny-weeny bit too big for the hearts, but should be alright for the lips.  This way I can start with the lips and then change to the hearts when I get sick of the lips!

Then it was just on with the basic construction - sewing it all together and matching seams and stuff like that.  And while I was at it I sewed all the lining pieces together at the same time so that both the inside and the outside were up to the same point (if that makes sense).  And following on from the detail oriented approach, the lining seams are all sewn using the 'french seam' method, so no frayed edges for the future!

At the end of two days of glorious time in my sewing room, I have ended up with this:


 The coat is all together bar sorting out the length, hemming it, and inserting the lining (and a few small other details).  And in putting this together I have been dreaming of the whole outfit I could create around this coat... but more on that later...

Oh, and if you want to see any other photos, check out my facebook page, which you can find here.

Beccie
xxx


Tuesday, August 7, 2012

12 months on - a project revisited

It was 12 months ago that this crazy sewing adventure started for me.  And it all started because of a coat.

I had seen a lady at a vintage fair wearing a beautiful princess seamed full skirted coat, and I wanted one.  And vintage being what it is, I couldn't find one in my size, the colour I wanted, or for a price I could afford.  I had a lightbulb moment when I realised I could borrow my mum's sewing machine and sew one from a vintage pattern!

 The pattern that started it all - isn't it beautiful!  Such an elegant coat.

So I bought a pattern, some fabric and started sewing (and blogging) and I haven't looked back.  Not once.  Not only have I loved every second of it, its been a real turning point in my life.  And twelve months on I've decided to make another coat, and this time do it better!

These are the fabrics I purchased - and I'm really excited about them!

I purchased this gorgeous Japanese wool flannel from Gorgeous Fabrics

I originally purchased the swirly black lining recommended by Gorgeous Fabrics, but decided I wanted to be more daring, and instead found this suitably amazing red polka dot satin... its scrumptious!

There are quite a few pattern pieces to cut out, and they are quite large, so I didn't get much further than the cutting out stage on the weekend I'm afraid...  But me being me, I wasn't content to just follow the pattern as is - no, that would be easy!

Hahaha - so true!

Instead I've decided to make the skirt of the coat a bit fuller, and the collar a little bigger.

 
You can see here that I added roughly an inch to each side of the eight skirt pieces


Last time with this coat, since I was VERY new to sewing, I had no idea what bound buttonholes were.  However I do now, and I know that they are a beautiful finishing detail on any garment.  I say finishing detail, but funnily enough they are one of the first things you have to tackle.  I haven't tried them before, but this coat deserves them, so I'm going to give them a go.

So yesterday I went looking for candidates in the world's most amazing button shop!  They don't have an online store (which, when you see the amount of stock they have, you can understand) so it was very lucky that I happened to be nearby.

Here are the three I chose:


Here is the difficult thing - I love them all, so I was hoping for some input from you guys.

CANDIDATE 1 - the Round Button.  Boring and predictable, but goes with everything.
CANDIDATE 2 - the Heart Button.  Cutesy and fun, and not too over the top.
CANDIDATE 3 - the Red Lips Button.  Whimsical and fun and a bit crazy.

So, who would like to put forward a suggestion on which buttons I should use... someone... please!!!

Beccie
xxx