Showing posts with label bound buttonhole. Show all posts

Thursday, September 27, 2012

A golfy polo shirt becomes....

.... a slightly smaller better fitting golfy polo shirt!!!

So, most of you don't know that I play golf.  Not a lot, but a bit, and not extraordinarily well.  Just enough to get me around without embarrassing myself!  One day I will make myself a pinup appropriate golfing outfit like this one:

In fact I have the patterns and the fabric, I just haven't gotten around to doing it...

Anyway!  Until that day I keep getting given shirts like this one when I play in corporate days:


Now what shapely young woman like myself would want to wear something like this?  Not me!

So, in the spirit of adventure, I decided to pull it apart and remake it in a way that would fit my curves.  I started by cutting out the sleeves and down the side seams.  I wanted to leave the shoulder seams and collar etc intact because there was NO WAY I wanted to attempt to put that bit back together.

Then I put it on my headless helper and made some darts:


And while I was at it, I marked where the point of the shoulder was, cause I didn't want a fitted polo shirt with saggy sleeves!

Then I sewed up the new darts, and re-drew the arm holes using the new shoulder point:


Then I sewed the sleeves back in, trying really really hard to match the white piping on the shoulder:


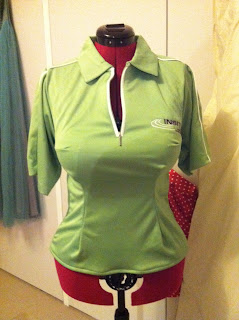
And then I chopped about 3 inches off the length, and made a new hem.  And the new polo shirt looks like this:


Much better!!!

Stay tuned tomorrow to my facebook page, where I will be posting a photo of me wearing my new, now fitted shirt, out on the golf course.  Fingers crossed my team wins!

Now, on a different note, I cut out the pieces for my shirtwaister on the weekend, and all the thinking about the way to lay the stripes got me thinking about the button holes... how was I going to work the stripes with the bound button holes?

The stripes on the bodice and the skirt run vertically, and the stripes on the collar and sleeve cuffs run horizontally.  I didn't really want to do horizontal stripes on the button holes cause one lip will be one colour and one will be another colour, which could look weird.  I thought I might be able to do vertical stripes like the bodice, but have them a different colour to the stripes on the bodice.  But then I thought why not do them diagonally?  So I made a test one:

Looks pretty cool, huh!

So the other thing I noticed when I did this test, was that I'm going to need to line my fabric with something.  This fabric is very light, and therefore a bit sheer.  So it needs something equally as light so it has a similar drape but isn't so sheer.  Thankfully I think I have just enough of a lightweight white cotton sheeting to do the trick!

Looks good with the button anyway!


Wish me luck tomorrow!!!

Beccie
xxx


Friday, September 14, 2012

Spring motivation and UFOs

And I'm not talking little grey men with big heads, big eyes and small mouths a la X-Files... rather Un-Finished-Objects!

There is something about Spring that makes me want to clean things up and finish things that I've previously had no motivation to finish... like this house coat.

Isn't it a lovely pattern!

I bought this pattern a while ago, and managed to find some floral corduroy to make it from and some lovely soft minkie fabric to line it with, and got ready to start... and thats where things started to go wrong. 

The corduroy was not as good quality as I would have liked, and it was REALLY narrow, so that mean that the coat isn't as long as I wanted.  And then I didn't have quite enough minkie - I was able to cut out everything but the sleeves.  And hot pink being such a popular colour, I have never been able to get any more of it.

So its been all cut out (well as much as I could anyway) and laying on the floor of my sewing room in the corner where I could ignore it for MONTHS.  Until last weekend.

Full of motivation from getting so much pre-washing and tidying done, I decided it was about time I got over my issues and got on with my house coat!

And of course I did bound button holes!  Now that I know how to do them, I'm addicted to their 'look'.


I decided to go with a contrasting pink for the button holes

And as is typical with me, I'm following the pattern, but I'm not following the pattern, all at the same time.  I'm lining the housecoat with the minkie fabric, but not in the same way that you would normally line something, since the minkie is heavier than the corduroy (I'm not buying from ebay again!).  Instead, I'm pretending that the right side of the minkie is the wrong side of the corduroy.  Except for where the front facing is, there it looks like the traditional lining.

Doesn't the pink go well with the corduroy!?!

But the remainder of the seams are sewn so that when you iron them flat, the corduroy shows over the minkie... like this:


Eventually this back seam will look like the top couple of inches on the vertical seam.  I've trimmed the minkie close to the stitching line (it doesn't fray) then I'm folding the seam allowance in half, with the cut bit going under.  Then I'll probably have to hand sew it down.  For the other seams, like the horizontal one shown here, I will make some bias tape out of the scraps or corduroy, and hand sew it around the seams.  I think it looks pretty with the corduroy showing over the minkie!

So anyway, I got a pretty long way through it last weekend considering I was also running around the country side and prewashing fabric!  It looks like this:

I've bought some heart shaped pink buttons for it!

I think when the bow embellishments are on it will look really nice!
I might do the bow in the pink cotton I did the button holes in yet...

And after all the worrying about it being too short, it comes down to my knees!  So this weekend I will attempt to put in the sleeves and the pockets and do all the other little tasks like seam finishing, hemming, stitching on buttons etc.  Fingers crossed I'll have a finished garment to show you next week!

And let me tell you, it feels good to get this thing off my floor!

Beccie
xxx

Thursday, August 16, 2012

A Project Revisited - Part 2

Well didnt I have a productive weekend!

After last weeks effort of pre-cutting all the pieces I would need to make my red coat, I managed to spend two whole days putting it together... but its not finished yet!  Oh no, there is still a way to go.

Making a coat like this is a bit of a committment of time and money, and if I'm going to do something I want to do it properly.  This means have the inside looking as pretty as the outside, even if hardly anyone sees it.

With that in mind I decided to run bias tape (because I can't readily buy rayon seam binding - might have to hunt some down and try it...) down all the long edges of the main pieces of the coat.  So it looks like this when the seams are sewn:
Pretty!

And wow didn't that take some time!  And some bias tape - about 16 metres of the stuff (or 17 and a half yards for my American friends).  A lot of effort considering the coat is lined and you will only ever see a couple of inches of it... Still, I'll know its there!

The other extra effort I went to was the button holes.  Ever since I found out what they were, I have always wanted to try bound button holes, but hadn't had a project worthy of the effort of doing them on... until now!  Serendipitously, the amazing blogger Laura Mae from Lilacs and Lace posted this extremely comprehensive tutorial on just how to do them!  You can find it here.

Using this tutorial, I did a test button hole using my fabric:

My first bound buttonhole EVER!

And I was so happy with the result!  So, with that in mind I moved forward on repeating the process on my coat front and facing.

This is the part where you make the little windows - kinda reminds me of a tissue box

Neat little windows

This is the end result, with the bits cut down and the thicknesses all graded

At this point some of you are probably wondering what buttons I chose...

Well the round buttons got two votes, and the lips got two votes, and the hearts got about 6 votes.  But, I really like the lips, even though they are crazy and over the top, so I've done buttonholes that are a teeny-weeny bit too big for the hearts, but should be alright for the lips.  This way I can start with the lips and then change to the hearts when I get sick of the lips!

Then it was just on with the basic construction - sewing it all together and matching seams and stuff like that.  And while I was at it I sewed all the lining pieces together at the same time so that both the inside and the outside were up to the same point (if that makes sense).  And following on from the detail oriented approach, the lining seams are all sewn using the 'french seam' method, so no frayed edges for the future!

At the end of two days of glorious time in my sewing room, I have ended up with this:


 The coat is all together bar sorting out the length, hemming it, and inserting the lining (and a few small other details).  And in putting this together I have been dreaming of the whole outfit I could create around this coat... but more on that later...

Oh, and if you want to see any other photos, check out my facebook page, which you can find here.

Beccie
xxx


Thursday, August 4, 2011

The Trouble with Buttons

Buttons - I love them but they can cause problems. Take these ones that I have pinned onto my coat for instance.

I purchased these vintage buttons on Etsy from LakeViewArts and they are beautiful and just what I wanted BUT they are too big for my automatic button holer on my sewing machine.

(By the way, these buttons aren't bronze like they look in these photos - they are actually black and very very shiny. And the fabric is much more black, and less grey...).

What to do now???

As far as I can see it there are two options:

1. I do the buttonholes by hand. This involves lots of finicky hand sewing and the end result will be a buttonhole that (more than likely) will look crap; or

2. I use the machine to do the stiches like the automatic function. This is harder than it sounds. I had several trial runs at it the other night and none of them turned out satisfactorily. Sigh!

It seems I should have done a bound buttonhole back when I started making the coat. I've never heard of bound buttonholes before until I found this tutorial today from Sewaholic. The end result looks very nice and finished, see:

But alas its too late now. You know it probably said something about bound buttonholes in the sewing instructions, but to be honest I didn't read them much because they weren't that much help... I kinda just made it up as I went along.

Any-hoo!

There is one way to solve this conundrum and thats to get more buttons - smaller ones - that can fit in the automatic buttonholer thingy on the sewing machine... I am yet to make up my mind on this. I think I need to do some more experimenting before I make a decision.