Friday, November 7, 2014

Swirl Sew-along : Part 4 : Bodice Construction

In the last post we added the pretty details onto our Swirl dresses - now we get to start turning the pieces of fabric into a dress!

This post is going to deal with bodice construction, but we have one more little 'chore' to do before we get onto that.  We need to make the tie belt.

Get your two pieces and fold them in half down the fold line and pin.


Then sew the each tie, leaving the short straight end open, and closing up the slightly pointed end.  Take your scissors and cut the corners off the seam allowance, and turn them through and iron them!  I find the other end of the bbq skewer really handy for this job!


Both ties get attached to the pointy bits of the back bodice pieces.  You will have marked the location in Part 2.  Pin a tie to each back bodice piece.
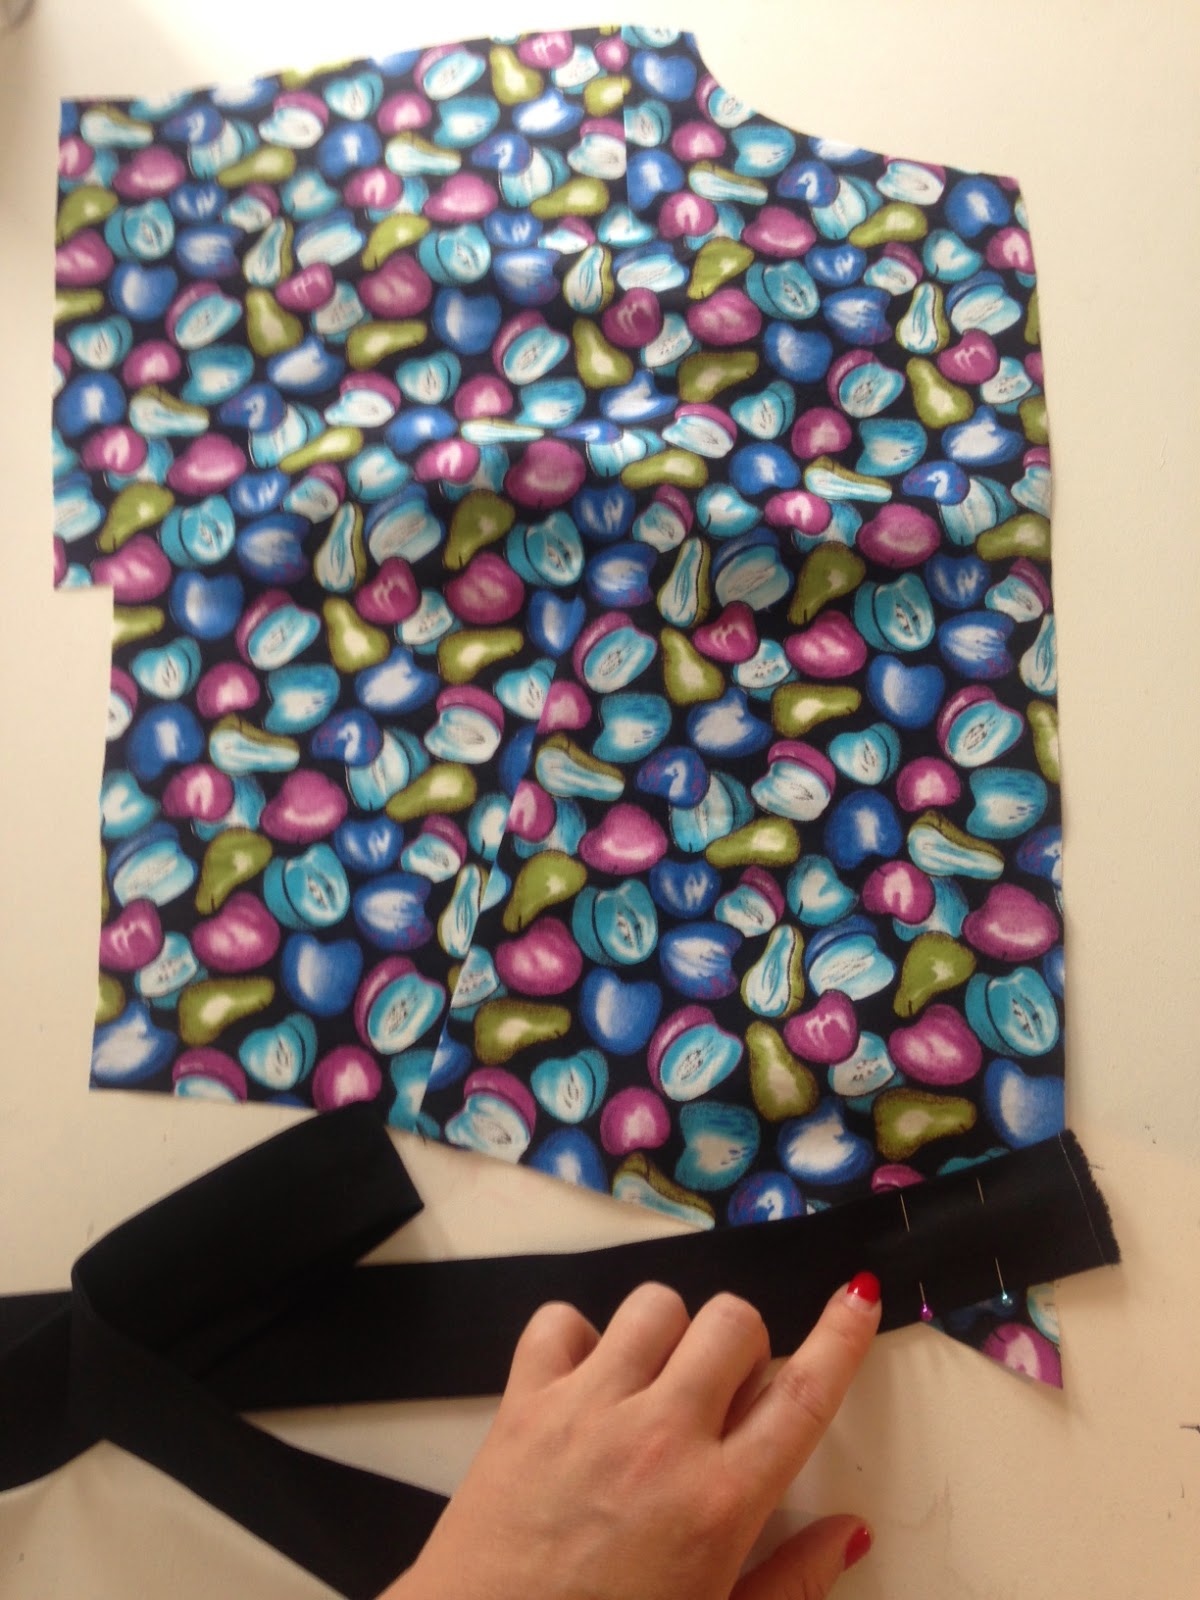

Now, these will be sewn in when we attach the back facing, but I don't want to leave them pinned on there until then, so we will just run a line of stitching at half an inch from the edge so its permanently attached.

And thats all the preparation we need to do - its time to put the bodice together!  Lets start with the shoulder seams.  I suggest you pin from the arm hole towards the neck.  Once you've pinned, sew!  (You will need to pivot where the shoulder seam does an up sweep near the arm hole)


For seam finishing, I'm a massive fan of doing things the old fashioned way.  If you have an overlocker / serger, feel free to use it.  I'll use my pinking shears.  Don't forget to clip the seam at the up sweep where you pivoted!


Then iron the seam open.  There is a school of thought that says you should iron the seam flat to 'set' the stitches before you iron it open.  I'm not sure about this.  It seems to be another step to me, to slow me down... anyone got an opinion either way on this one???

Using a tailors ham will help you press the curved shoulder seam

On to the side seams!  Both side seams need to be sewn a little differently.  But they both start at a point that we marked in Part 2.  You can see it in the photo below.  I have marked it with a double pin.  The other thing I've marked with a double pin is where I need to leave the seam open for the tie to pass through.  This happens on the left side only.  The right side seam gets sewn from the arm pit to the waist.


Sew both of the side seams and press them open.  You will also notice that you press part of the arm hole open in the process. 


Now we need to reinforce where the tie passes through.  All you need to do is sew a rectangle around the opening with small stitches.  Easy!


Then on to the arm hole!  Fold the arm hole back to where you clipped the up sweep, and iron the fold line in.


Then fold the edge back underneath to the fold line and press again.


Then stitch the fold down at 5/8".  Its a little difficult, but you need to start as near to the end as possible.  Have a look at the photo below, it will probably explain it a little better.


So you now have a bodice!  HOORAY!!! 

X

Give yourself a pat on the back and go and have a cup of tea (or a cocktail!)

Beccie
xxx

Tuesday, November 4, 2014

Swirl Sew-along : Part 3 : Pretty Decorations!

In the last post, we marked up our fabric and sewed and pressed the bodice darts.  BORING!  This post will be much more fun, because unlike most other patterns, we add the pretty bits now, not at the end!

To do the decorative piece on the bodice and pocket 1 (if you have chosen to do pocket 1) you will need to cut some strips of fabric that goes with your main fabric, but is different.  You won't need much - you've probably got enough in your scrap bag!

Cut one strip of fabric 30" x 2.5" (76cm x 6cm), and two strips 10" x 2.5" (25cm x 6cm).  These strips do not need to be bias strips, just straight on grain strips.  Then you need your iron.

Fold the fabric in half length ways and gently press it.


Open it up with the fold down, bring one edge to the centre line you created, and iron the fold.

Ignore that line that' you can see near my badly painted fingernails.  I forgot to take a photo and had to go back....

Do the same thing on the other side so the folds look like bias.


Now, this is where the Bodice Trim Guide comes in!  Take the longer strip and find the centre.  I do this be folding it in half and sticking a pin in it.


On the wrong side of the fabric, line up the centre line of the guide with the centre of your trim.  Mark the three points of both miters, and join the dots.  Also mark where the ends of the strip are.


Fold the fabric at the point of the miter and pin it.


And stitch along the line.  Then iron the corner open.  Don't worry that it isn't a right angle (I freaked out the first time!)  If you want to stitch ric rac to this piece, now is the time to do it.

Here is one I prepared earlier!

Then we get to stitch it to the bodice.  Put the front bodice piece on the table and lay it so the neckline is flat.  Then lay the trim piece over the top lining up the end markings on the trim and the location marks on the bodice piece, and pin it in place!


The decorative piece then needs to be stitched on carefully.  This stitching will be seen, so I recommend that you use a slow speed on your machine as the line of stitching will need to be close to the edge and straight. 


Make sure to pivot with the needle down in the corners.

Pivoting is when you get to the corner, and you leave the needle down, lift the presser foot and spin the fabric around the needle.

Hooray!  Now on to the pockets (remember, this bit is only for the people doing the square pockets.  We will do the curved pockets later).

You have four pieces to make two pockets.  The first step is to put the decorative trim you prepared earlier.  (By the way, if you are putting ric rac on it, do it before you do this step).  Line you trim up parallel with the top, but 1.75" (5.5cm) down.


Then sew it on the way you sewed on the trim for the bodice - slowly and carefully!


Right, now to make the pocket pieces that you will sew onto the skirt later.  Pin a plain pocket piece onto a decorated pocked piece, right sides together.


Ooo!  Here's another tip!  Sometimes its really great to know where you need to pivot on a corner so you stay exactly 5/8" away from the edge.  I have a clear ruler that I have drawn a line on with texta that is 5/8" away from the edge.  I then use it to draw lines to show me the pivot point!  Eventually your eye gets pretty good, but sometimes I like to make really sure I get it right!


Have a look at the pins I have placed to hold the fabric together.  There are two that extend over the edge - they are the start and stop points for the stitching so there is a gap to turn the pocket through.  Make sure to start and stop with tiny little stitches that won't unravel.

Then cut the corners off like this:


and turn it through!  I like to use a metal bbq skewer to help me get all the points and seams clean.  You just need to be careful not to poke through the stitching!  I also run the skewer along the straight seam lines to encourage a smooth line when I press it.

Speaking of pressing it, iron both the pockets on both sides and your done!


Phew!  That was a long post!!  But wasn't it fun to actually do the decorative bits so early in the pattern?

Oh, and check out my scalloped bias!  I had to do it BY HAND because my silly sewing machine wouldn't work with the tutorial I was directed to online (which you can find here if you want to give it a shot).

Get Swirling girls!!

Beccie
xxx

Saturday, November 1, 2014

Swirl Sew-along : Part 2 : Marking Up and Darts

By now you will have followed the instructions in Part 1 and cut out your fabric pieces.  In Part 2 we will mark up the pieces of fabric you have cut, and sew the darts.

But lets start with marking up the pieces.


Here is a list of all the pieces, and what you need to mark.  You need to mark on the back side of your fabric (lets call it the ugly side) to make it easy for yourself.  This is why its always better to fold your fabric pretty side in when you cut it.  You can either use a chalk pencil or one of those water soluble textas depending on the colour of your fabric.
  • BODICE FRONT : waist dart, bust dart, circle at arm hole, where the bodice decoration meets the edge of the pattern piece, and the clip line on the neckline.
  • BODICE BACK : waist dart, shoulder dart, circle at arm hole, button hole, circles on side seam, where the tie-belt attaches.
  • BODICE FRONT FACING : clip line.
  • SKIRT FRONT : the pleat line, the pocket line
Yes, there are those bloody triangle thingys, but I never mark them on a pattern and I'm doing ok.  If you normally use them, I have put them in for you, so go right ahead!

The next job actually involves sewing - HOORAY!

But its my least favourite type of sewing - darts.  Ugh!

I've always thought the hardest bit about sewing a dart is actually sewing it so all the points are taken up as noted on the pattern.  I have come up with a method of pinning my darts to give me the best possible chance of sewing the dart correctly.  I insert a pin in one marked point through to the right side of the fabric, and back out the other marked point onto the wrong side of the fabric again, making a hill out of the fabric in between - like this:


Once all the marks are pinned, I pick the fabric up by the hill, and let it fold along the created line.  I push the fabric together so each mark comes together at the base of the pin.


I then insert a pin pointing to the point of the dart so I know where it should finish, and I put pins in away from the stitching line to stop the fabric moving and pull out the pins going through the points.


Then I sew my way through all the points to the place where the dart finishes.  But before we do that, I want to mention the few tips I have learned about sewing darts.

I start and stop my darts (well, all my seam lines actually) with about half an inch of very short stitches - about a 1.0 on my machine - before I go back to my normal stitch length.  Some people do a stop stitch (that special knotting stitch that some machines have) or do a back stitch.  But in fine fabrics that can cause bulk, so its best to develop a different habit.  It is also wise to knot the threads at the point of the dart before you cut the excess thread off.

There is also something you should do when sewing a dart that ends at or near the bust.  No-one wants pointy bust darts.  No-one.  So instead of letting the line of stitching run off the fold in a straight line, curve it, to eliminate the point.  If its a shoulder or a back dart, don't worry a jot about the curve, just go straight off the edge.

The dart below was sewn just as described above:


Close up of the curvy bit at the point.

To make things more speedy, I sew all my darts before I iron them, so I'm doing things more in an assembly line style.  But when you do choose the iron them, press the shoulder and waist darts towards the centre, and the bust lines down.


Thats all that I am going to cover in this post.  The next one will be up soon, and will be much more exciting than this one!!!

Beccie
xxx

Wednesday, October 29, 2014

Swirl Sew-along : Part 1 : Cutting Your Fabric

Well isn't this exciting!  We are finally starting our sew-along!!!

First of all I want to say I have been completely overwhelmed by the interest in this sew-along.  I expected maybe 20 people would want to join me, but its actually around 120!  I have struggled to keep up with the demand, and I have to say thank you to everyone for their patience while I got through it all.  So once again, thank you!!!

Now, lets get going!!!

My first instruction is:

PRE-WASH YOUR FABRIC!

I know there are a lot of people that skip this step (especially those new to sewing) but I'm here to encourage you not to.  We will more than likely be mixing different fabrics here - using different bits and bobs to embellish our dresses.  You really need to pre-wash all of it.

You may remember this Christmas dress from a few years ago:


Well, because I was in such a rush to make four dresses that weekend, I didn't prewash the fabric I used to make the halter strap and the bow.  Guess what happened.


The first time I washed it, the dye from the red fabric ran all down the front of the bodice and on to the skirt.  I have washed it several times now, and its faded enough to wear, but it doesn't bear close inspection.  I have also heard other horror stories about pant legs that shrunk up, fabrics that shrunk differently and caused warping in the design, and more colour run stories.  So lets just all be safe and wash it!

Now the lecturing is over, the fun can begin!

Cutting Layouts.  I have to confess that I never follow these things! As long as the grain arrows are pointing in the one direction I just fit them where they fit!  I haven't had a problem to date!!  But I know there are people that like these things, so here are the ones from the original pattern instructions.


Now - there is one piece that you don't need to cut out - the Bodice Trim Guide piece.  It is a guide only, so we don't need to cut it out.  But don't lose it!  We'll need it sooner than you think.

I also want to talk about something that dawned on me last night while I was supposed to be sleeping (don't you love that!).  Please put on something that fits you well and get your tape measure, and measure from the shoulder seam, down over a boob to your waist (it will be a slightly diagonal line).  Particularly you ladies with large boobs, and you ladies with short torsos, and you ladies with long torsos.  Ok just everyone do it.  Write down what the tape measure says.

The pattern has a shoulder to waist measurement of 17".  Now, the fit is supposed to be a bit blousy (trust me, they look better that way), so if you measure 15" or 16" I wouldn't change anything.  But if you measure. 14" or anything over 16" I would change the length of the bodice pieces to give yourself an inch or two of space.

Take your scissors and chop the bottom of the pattern off like so:


IF YOUR MEASUREMENT WAS SMALLER:
Overlap it however much you need to, lining up the centre front side:


Tape it together then take your scissors again and cut the side so you have a smooth line not that jagged line.  Easy!

IF YOUR MEASUREMENT WAS BIGGER:
Get another piece of paper and put it behind your two pattern pieces, lining one edge up with the centre front.  Then space the two pieces apart how ever much you need to.  Tape it together.


Cut off the excess paper and cut the side so you have smooth line.

EVERYBODY - Don't forget to do the same thing for the back bodice piece, and the back bodice facing piece.

UPDATE TO COME - it seems those of you with an XL pattern may have to add their excess in a slightly different way.  I'll add to this post in about 24 hours with instructions for you ladies.

Also, while we are thinking about making little adjustments, you might want to cut the skirt pieces a little shorter depending on how you like to wear your skirts.  The pattern will give you a skirt that is approx 30" (if you do the hem like I'm going to show you).

If you don't know how long you normally like your skirts, go and grab your favourite dress out of your wardrobe (or more likely, the washing basket).  Measure down the side seam (so you know you have a straight line) from the waist to the hem.  Then add an inch to that measurement.  That is how long you need to cut your skirt pieces.  Make that change now (if there is one) before you cut your fabric.  It will save fabric and effort later!

I think thats enough for our first post!

Get cutting ladies!!!

Beccie
xxx

By the way, if you haven't joined and would like to, its not too late!  Comment here, or send me an email to sewretrorose(at)gmail.com.

Friday, October 24, 2014

My New York Holiday : Chapter Six

At the end of the last chapter we had had a fabulous (and late) night of cocktail drinking at some amazing New York Bars.  Guess how I felt the next day....


Not hungover (surprisingly) but VERY tired with hair that didn't dry.  So yes, I actually went out on the streets of New York in rollers.  Hang my head in shame!

In my defence, I didn't spend very long on the street - just long enough to put my suitcase into the hands of the bus driver and board the bus - and it was 7am... so not too many people noticed.  We were up early and on a bus because we were headed out of New York City into Massachusetts to go to the Sturbridge Vintage Fashion and Textile Show, and the Brimfield Antique Show.

Sturbridge and Brimfield (which are really close together) are about 5 hours from New York City... and the bus ride was pretty quiet... we were all either tired, hungover, or both.  But we found a second wind when we hit Sturbridge, because it was time to SHOP!

The show was in the same hotel where we were staying, so we were able to leave our bags and head straight there.  I will say that it was a bit confusing because there was two rooms... but no signage to say there was two rooms.  I thought it was just the small one and wandered around and was really happy I'd seen it all - then someone said there was a big room... OH MY GOD!!!  There were some truly amazing things.  I fell in love with some incredible victorian and edwardian clothing that I just wanted to take home and display as art.  So divine!

You will notice that there aren't many photos... thats because we were all distracted and didn't take any!!!

I bought quite a lot of things, but the most important thing was this.


A bakelite "MacArthur Heart" brooch.  For most people, this is the most collectible piece of bakelite in existence.  It was featured on the cover of Life magazine on the 28th of April, 1941, and sells for A LOT when it comes up for sale.  I got a pretty good deal on mine, but it wasn't cheap...

I now need a copy of this magazine...

Most of us were done well before the show closed - we were just too tired.  Thankfully our hotel was in the most beautiful location, and our rooms opened up onto this view.


About half the girls (including me) sat around on chairs in the sun and chatted and watched the world go by... it was such a peaceful time after the noise and constant buzz of New York City.

After a good nights sleep we were up early again the next morning to head to Brimfield.  None of us really knew what to expect, other than it was outdoors, it was massive, and there would be a lot of walking to do.  I had purchased a special outfit.

A vintage rayon playsuit and a vintage straw hat

This is my first playsuit, and I love it!  I didn't know how I would feel about showing this much leg, but I was so comfortable all day!!!  And can I say that that is saying something - because this day was the hottest day they had all summer... and it wasn't technically summer anymore!

Brimfield basically turns itself into a giant outdoor antiques mall for 6 days, with stalls lining about 1 mile of road, and then out from the road quite a distance.


I have never seen anything like it!  You could pretty much find anything.  Marianna and I gave up on trying to see everything and decided just to shade-hop instead.  If a stall had shade, we would look at it.  If it didn't, we weren't going there.

We found a stall (there were a few actually) that sold freshly made lemonade - oh god it was so good!  We went back for a second one later in the day on our way back to the bus!


We managed to find somewhere air conditioned for lunch - and we found Joy!

This has got to be the worlds biggest salad...


Right when we needed to be boarding the bus, a massive rain storm came through - it had been building for a while and dumped down at about 1.30pm.  It did serve to make everyone get back to the bus as quickly as possible!!!  Everyone had had an amazing day and had found plenty of treasure.  Show and Tell on the bus as we headed back to New York City was lots of fun!

That night I decided to take it easy and bought myself a bottle of Verve Cliquot and sat in bed and enjoyed it and some chocolate chip biscuits after a much needed shower.

So, have you ever been to Sturbridge or Brimfield?  Ever had fresh lemonade?  Ever sweated so much that your hair dye has run into your shirt and your hat?  Ever had a bottle of Verve for dinner?

Beccie
xxx